Text Messaging
Don't have an Instabot account yet?
Contents
- Overview
- Integrate Text Messaging into your Account
- Build your first Text Messaging bot
- Set Trigger Keyword for launching your Text Messaging bot
- Set messaging settings on the company level
- Text Messaging bot in action
1. Overview
Instabot's Text Messaging feature allows businesses to create text messaging bots and engage leads via 2-way text through a dedicated phone line. You can add a line OR connect an existing cell phone line to your Instabot account regardless of your tier.
Your Text Messaging bot will be launched from your business phone line when a user texts a specific keyword. For instance, you might create an announcement on a website or storefront, like, "Text HELLO to (917) 615-0618 to learn more about us." Once you've received the specific text message “HELLO” on your business phone, the bot will be triggered from the native messenger app on a user’s phone. Your users will have the same great experience of chatting as they currently have on the website or Facebook chatbots.
In the same way that any other bot, the Text Messaging bot conversations can be turned into a live chat with a human agent using the “Take over” option or via the “Human takeover” node in your bot.
In this article, you will learn how to enable the Text Messaging feature on your account, how to create Text Messaging bots and customize settings, how to use our dedicated templates for easily creating Text Messaging bots and the best practices that we recommend related to telephone consumer protection regulations.
Let's get started!
2. Integrate Text Messaging into your Account
To start, you have to connect a phone number to Instabot. There are two alternatives:
2.1 Purchase a new phone number
You can purchase a new dedicated phone number from the Instabot portal to use it in your Text Messaging bots.
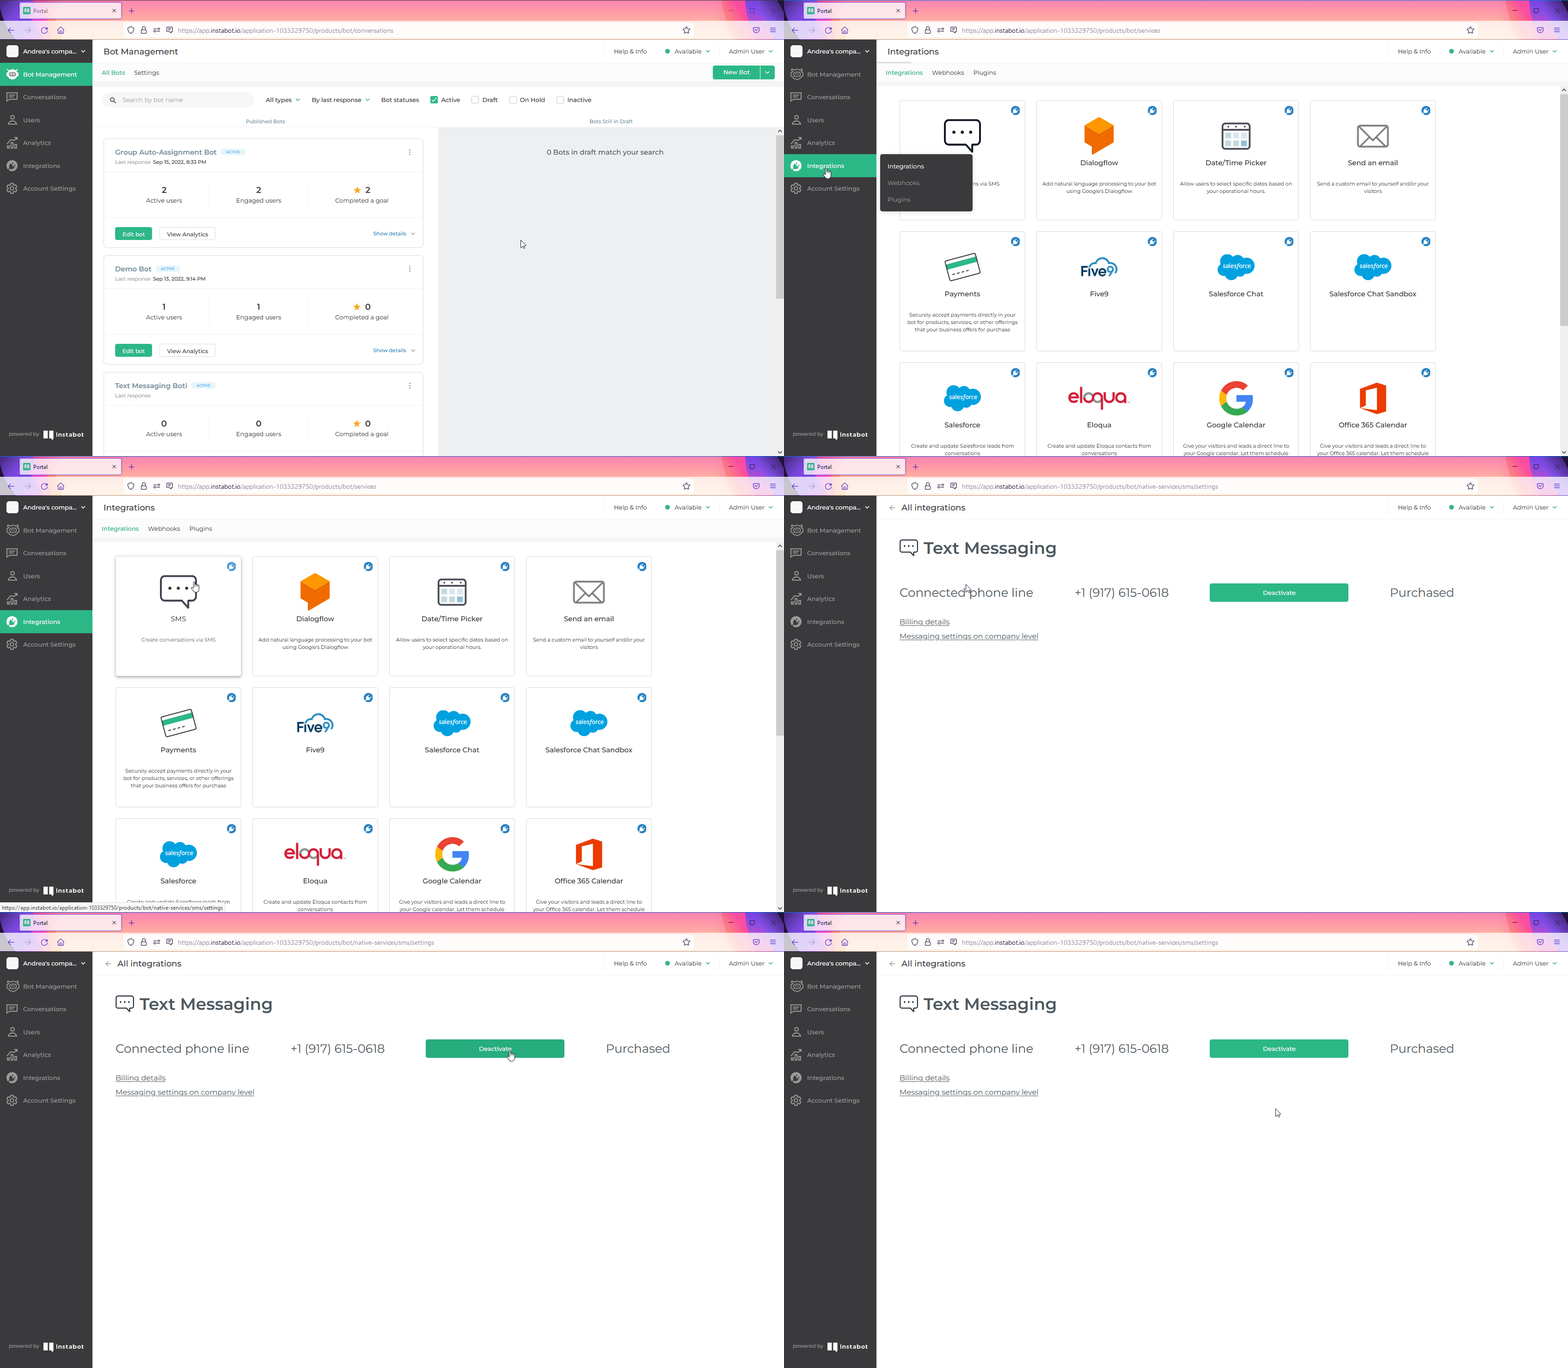
In the Instabot Portal, go to the Integrations tab and select the SMS option. From here you can purchase a new US phone number. Please note that this service has a one-time setup fee, click here for more information.
At the end of the purchasing process, you will find here your new dedicated phone number. This number will be associated with all published Text Messaging bots in your account.
On this page, you also can “Deactivate” your number. Please note that reactivating a phone number will charge a new one-time setup fee.
Text Messaging Integration
Once you have purchased a dedicated number, you can get the message bundles that are usage-based, auto-renewing, and will not expire monthly/annually. Please, check here for the bundles’ prices.
Please note that currently available for US and Canadian subscribers only.
2.2 Use your phone number
Canadian and previously owned US numbers can be set up manually in 1-2 business days. Please, contact us at [email protected] for requesting this service.
3. Build your first Text Messaging bot
Once the integration is set up, the Text Messaging bot creation becomes available. You can build your Text Messaging bot from scratch or you can use our powerful Text Messaging templates that resolve most of the common use cases.
3.1 Build a Text Messaging bot
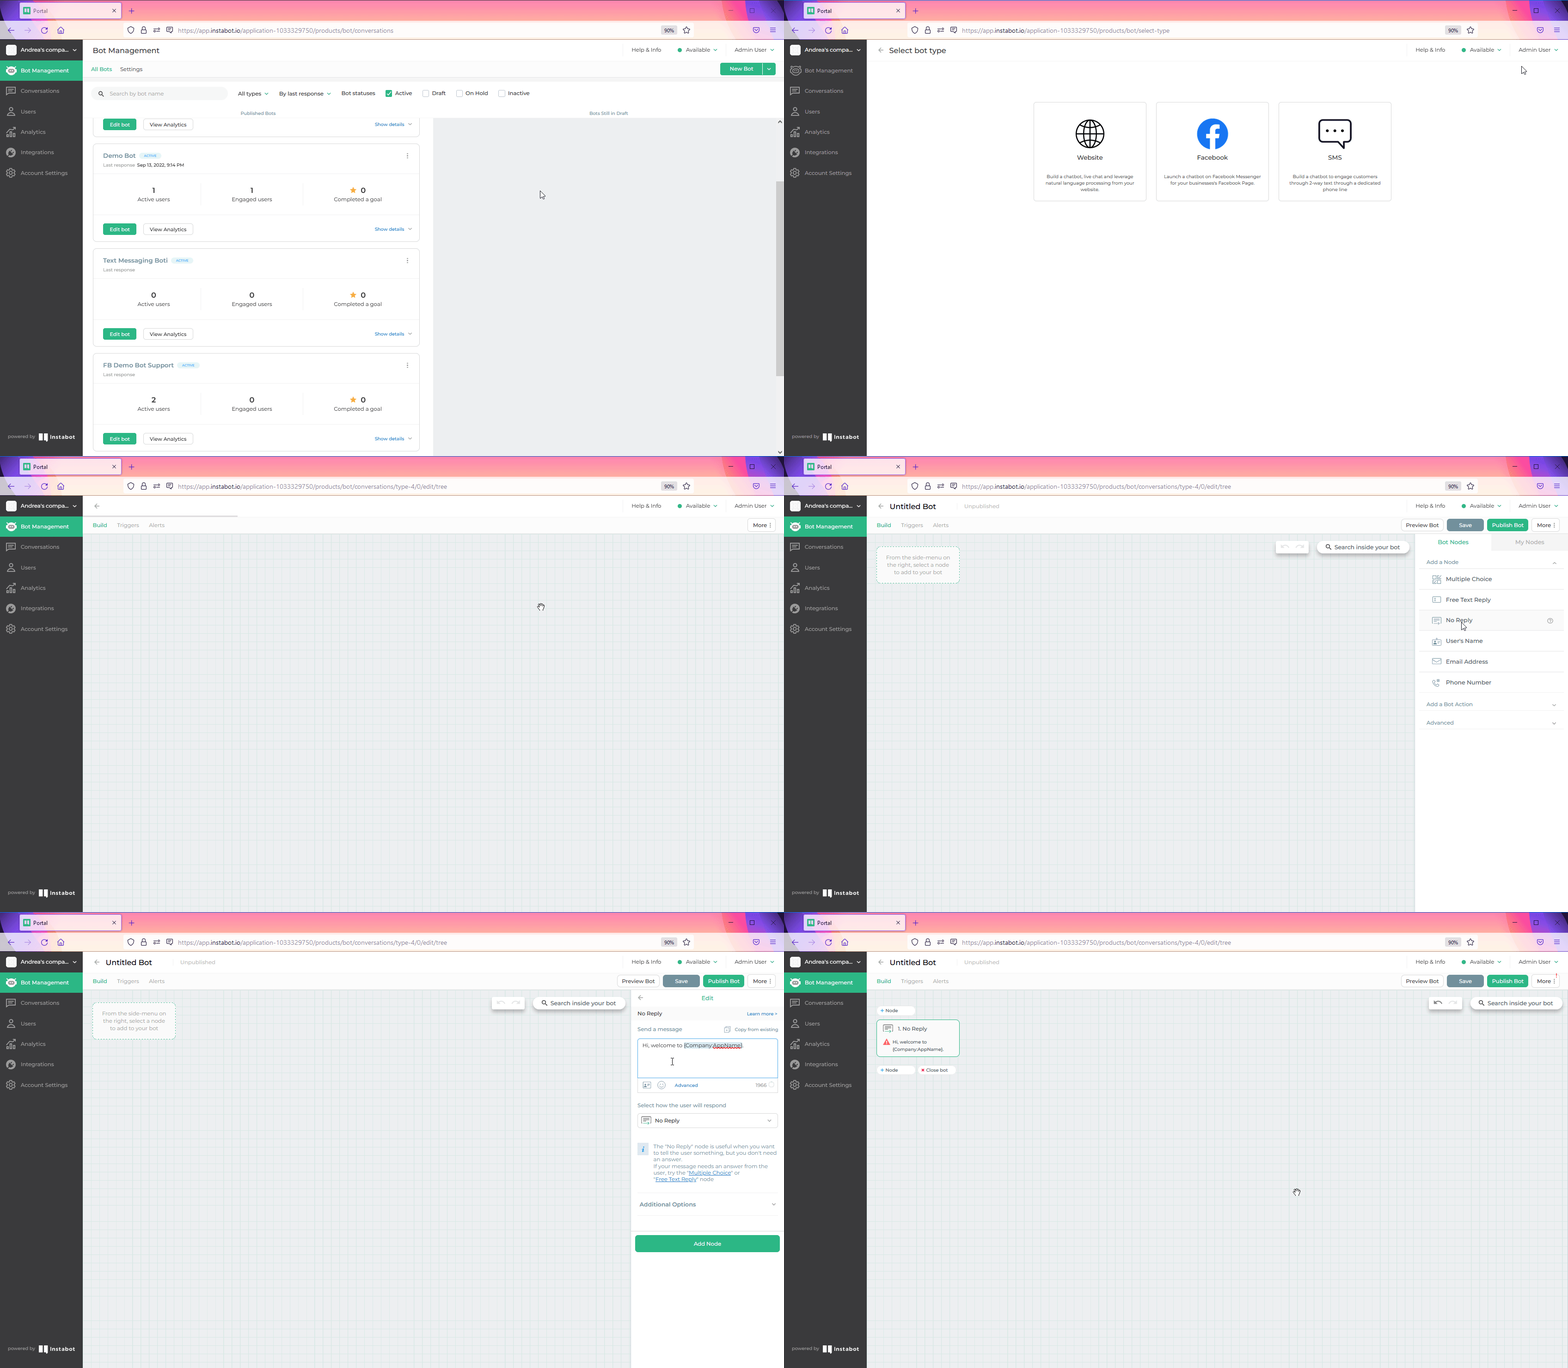
On the Bot Management tab, click on the New Bot button and select the option “SMS”. Let’s see how to start.
Start building a Text Messaging bot
On your Text Messaging bot, you can add several types of nodes such as Multiple Choice, No Reply, Free Text Reply, Name, Email Address, Phone Number, Opt-in to text messaging, and Human Takeover.
When you finish creating your Text Messaging bot, be sure to test your bot using the Preview Bot option on the Bot Management tab.
3.2 Use the Text Messaging templates
We have designed six Text Messaging templates for creating your bots. You can find these templates when selecting the option “New bot from template” on the Bot Management tab.
-
Web-to-Text Lead Capture: with this template, you can initiate a lead capture from the web by a user choosing to enter their phone number, clicking a link to open the native messenger app on their phone, and sending the key phrase, which is pre-populated.
-
Text Messaging Lead Capture: with this template, you can initiate lead capture by a user texting a phone number with a phrase. The bot will reply with two-way opt-in language. A series of basic form-fill questions will be asked (Name, Email, Inquiry, Follow Up).
-
Text Messaging Lead Qualification: using this template you can initiate lead qualification by the bot can ask the lead a series of validation questions to ensure they are a good match with the business services.
-
Text Messaging Promotion: this template makes easily texting a lead with a standard promotion code for services when they provide their phone number, etc.
-
Text Messaging Appointment Scheduling: this template is designed to text a Lead a link to book a consultation appointment when they pass through a series of qualification questions.
-
Text Messaging Live Chat (Human Takeover): you can use this template when you want that a bot passes a request to a human agent who will take over the chat, all in text.
3.3 Best practices
According to the US/Canadian legal requirements, we recommend using a special Opt-In to text messaging node at the very beginning of a bot to get an active agreement from a user to get messages from the business. If the user has not accepted to opt into messaging or has explicitly opted out, further texts will not be sent from Instabot's side.
Please note that legal requirements are different according to the Country, let’s see where to find more information about them.
USA
- Under a law called the Telephone Consumer Protection Act (TCPA), you must have “prior express written consent” from contacts before you send them any marketing text messages.
- When a contact texts in a keyword or submits an opt-in form, you should follow a double opt-in process and use the opt-in text to obtain a contact's prior express written consent.
- Click here to learn more about the recommended US opt-in processes and set-up.
Canada
- Regulations set by Canadian Carriers require that you follow double opt-in contacts when they submit an opt-in web form, however, when a contact texts in a keyword, you can follow a single opt-in process.
- Click here to learn the requirements for Canadian opt-in and subscriber text messages.
United Kingdom, New Zealand, and Australia
- Unlike the USA and Canada, which sometimes require you to double opt-in contacts, you can single opt-in contacts whenever they text in a keyword or submit an opt-in form.
3.4 Adding an Opt-In the text messaging node to your bot
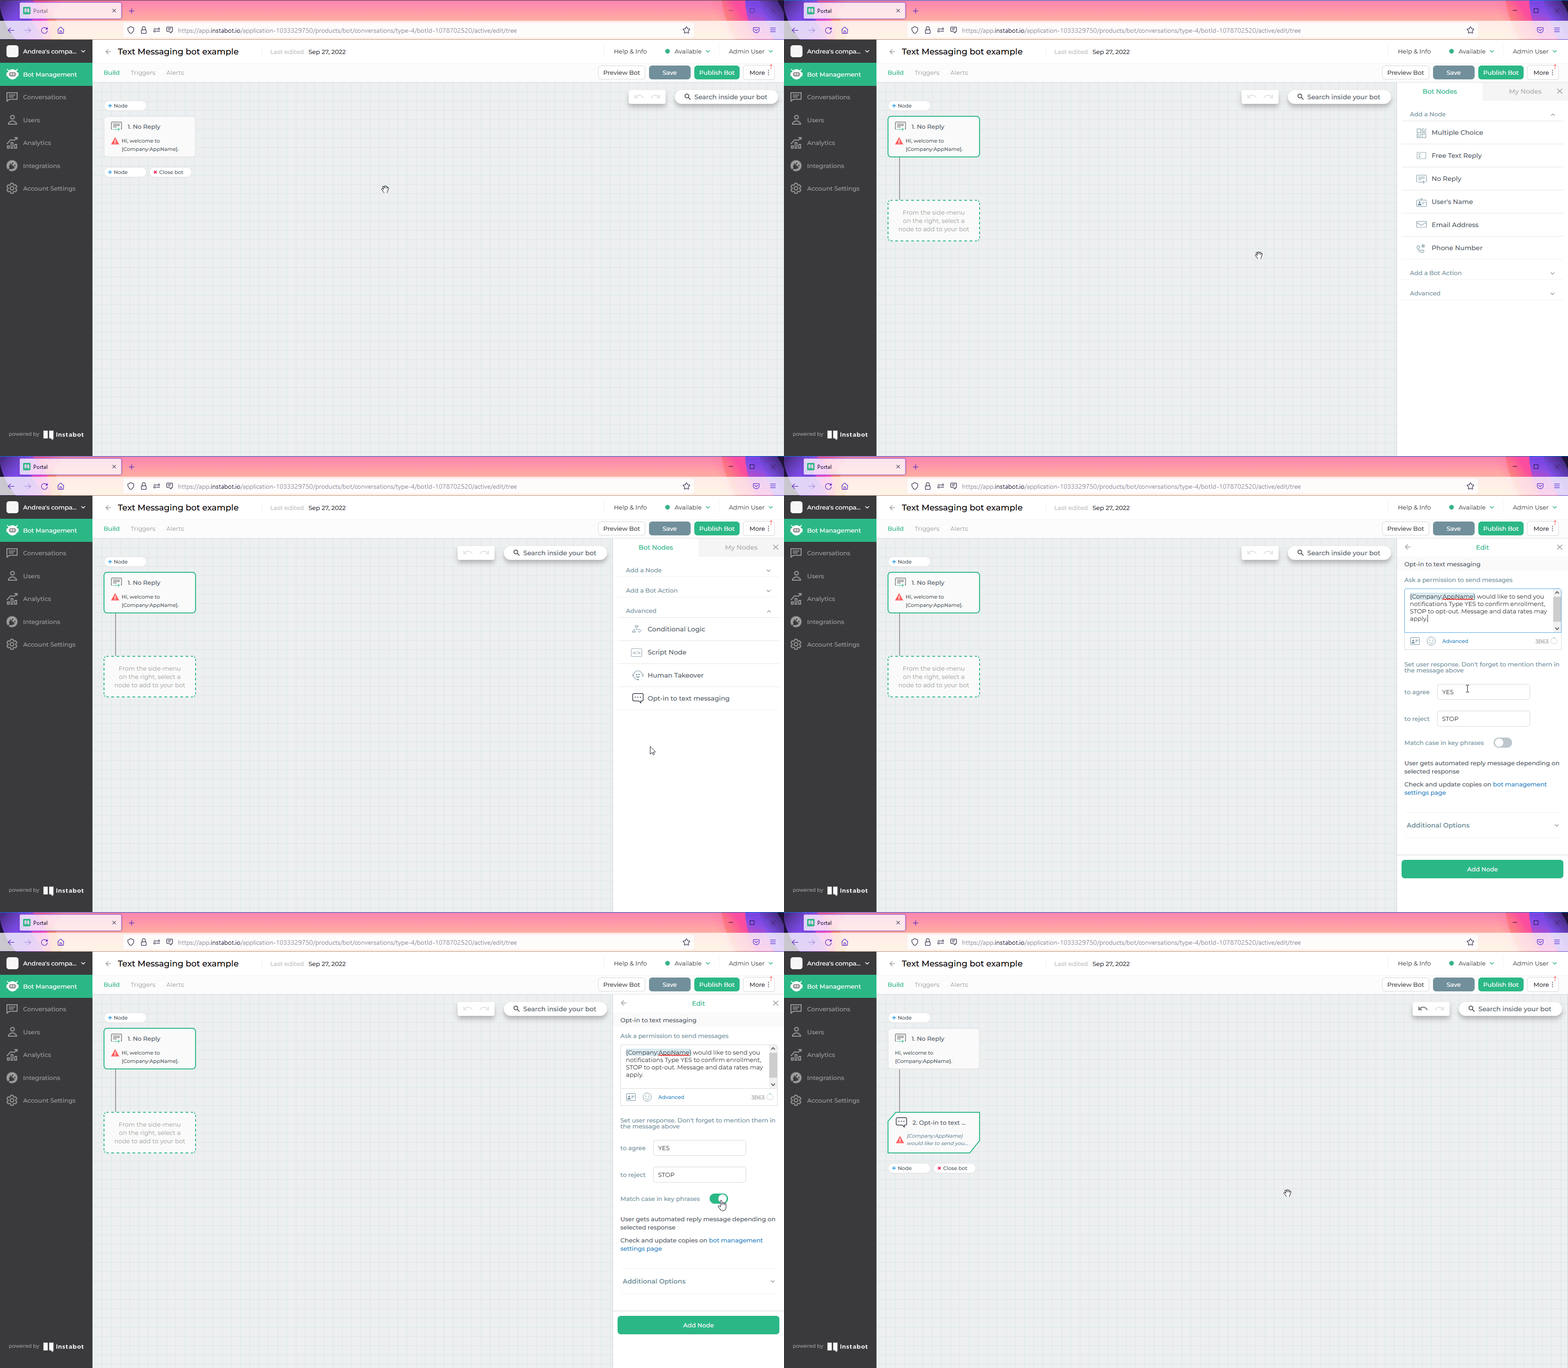
Opt-In to text messaging node is available on the Advance options of the Bot Nodes tab while building your bot.
When you choose this node type, you can customize the message that will be shown for explicitly asking permission from your end users to receive messages from your company.
This node has two possible answers, already predefined:
- Agree
- Reject
You can set up the keyword associated with each answer. Your end users should type one of the two keywords for continuing.
- If the user types the keyword associated with the rejection (for example STOP) then your bot will stop sending messages to that user and the bot path is closed at this point.
- If the user types the keyword associated with the agreement (for example YES) then your bot will continue with the path that you defined after the Opt-in node.
Also, as part of the Opt-in node settings, you can match the user selections with the key phrases by turning on the switch “Match case in key phrases”.
When this option is turned on, your users get an automated reply message depending on the selected response. These replies can be customized by clicking on the link Bot Management setting page that you will find below the switch. Please see here for more details about how to customize the key phrases.
Let’s see how to add the Opt-in to text messaging node in your bot path to compliance the regulations.
Adding a Opt-In node
4. Set Trigger Keyword for launching your Text Messaging bot
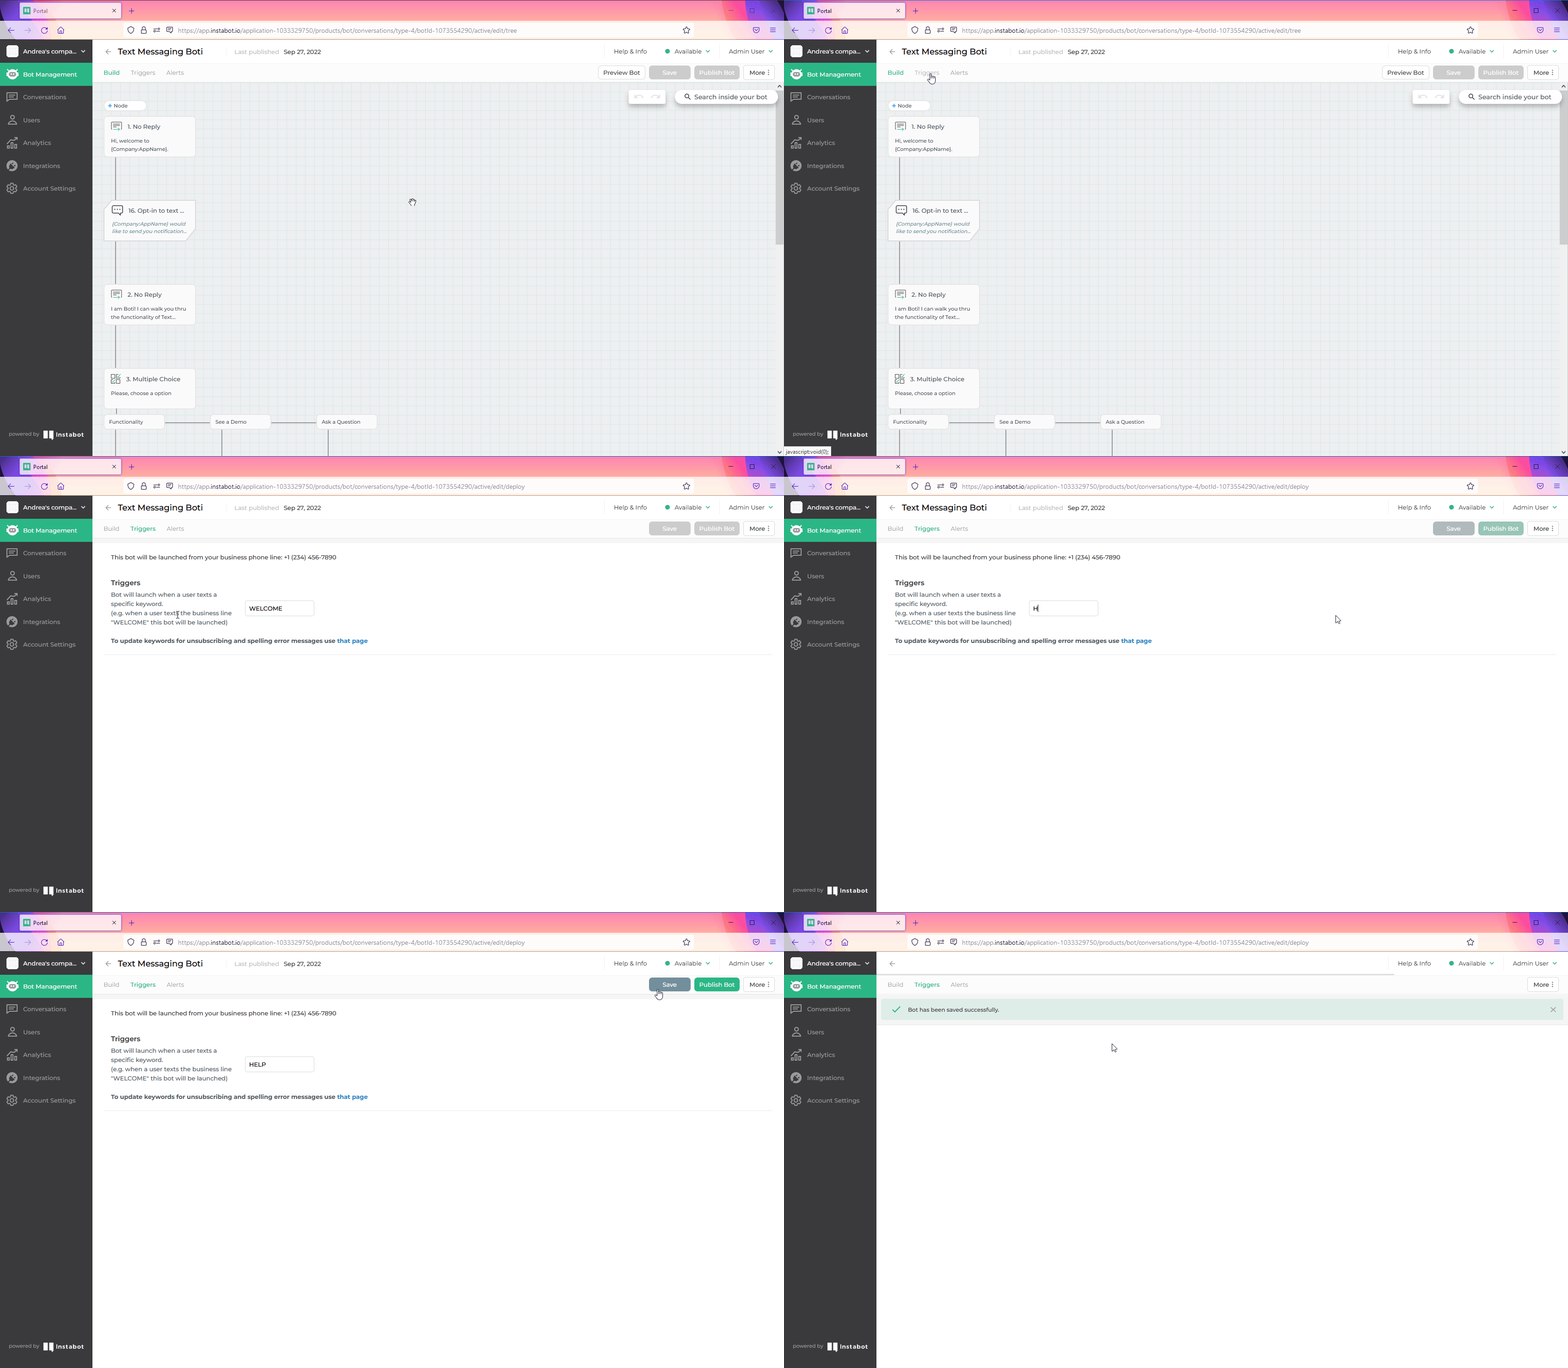
Text Messaging bots are triggered by the end-user by sending a keyword to the integrated phone number. The keyword is set for each bot separately. End clients will need to know the business' number and send a keyword to initiate the bot conversation.
On the Bot Management tab, while editing your Text Messaging bot, click on the Trigger option for customizing the specific keyword that will launch your bot. Let’s see how to do it in the following video.
Trigger Keyword setup
5. Set messaging settings on the company level
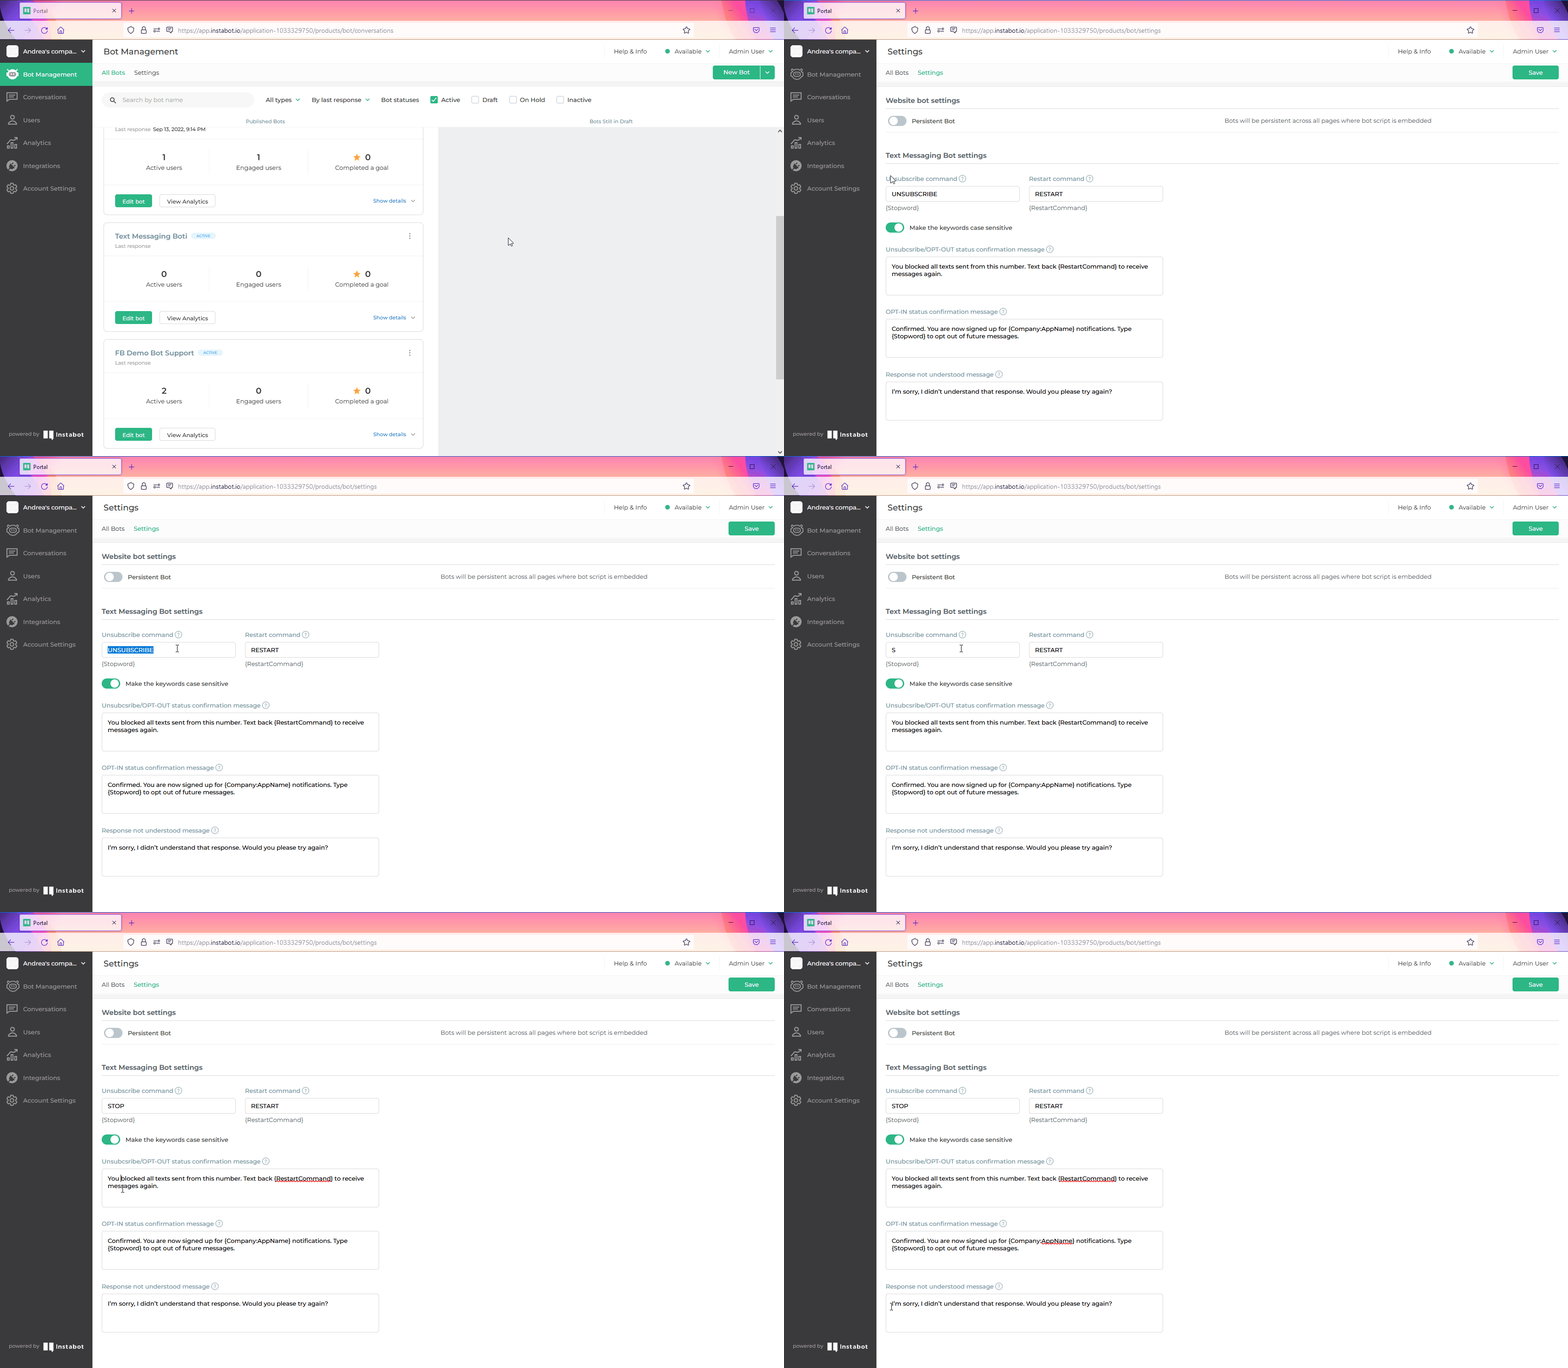
At the company level, you can configure Text Messaging settings that will apply to all Text Messaging bots in your account. Those settings are:
-
Unsubscribe command: The stopword applies to all bots associated with your account. When a user texts the stopword, it will opt them out of all future text messages from your business line unless they type the restart command.
-
Restart command: When opted-out users send the restart command, they will return to opted-in status and are eligible to receive messages from the business.
You have the option to make Unsubscribe and Restart keywords case-sensitive by turning on the switch below them.
-
The Unsubscribe/Opt-Out status confirmation message: You can also customize the message for confirmation that users have opted out of messaging or confirmed that they do not want to receive messages. This message is also used by the Opt-In node if you turn on the switch “Match case in key phrases” while adding/editing that node. Instabot sets by default an Unsubscribe message in which the Restart keyword is included.
-
The Opt-In status confirmation message: This message sends when users agree to receive messages at an Opt-in messaging node. When users agree, they will get an automated reply configured here. Instabot sets by default a confirmation message in which the Stopword keyword is included.
-
The response has not understood the message: When a user message does not match with known answer choices (e.g. spelling errors or unexpected strings), your bot will send this response.
Let’s see where to find and edit these settings.
Set Messaging settings
Please note that you also have links for accessing Messaging settings in:
- Opt-In node editing page
- Integration tab after setting up your phone number
6. Text Messaging bot in action
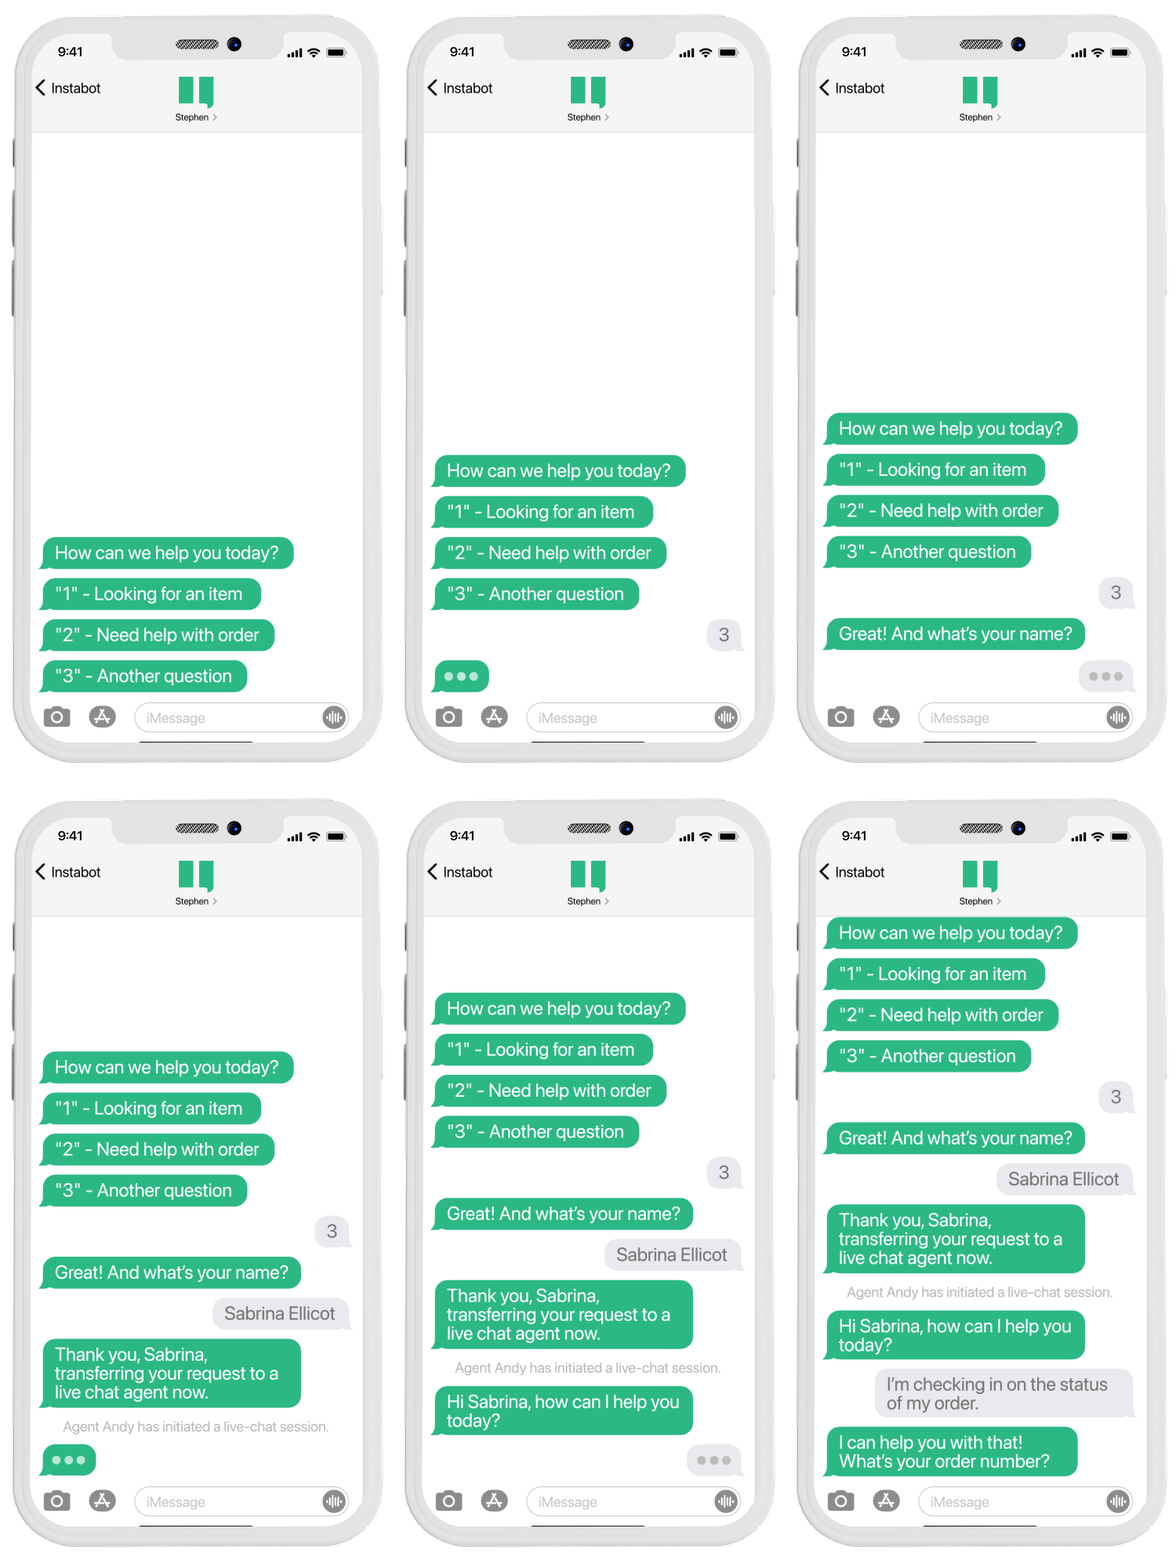
Let’s see an example of a Text Messaging Bot using a purchased new phone numbers.
Text Messaging bot conversations can be turned into a live chat with a human agent using “Take over” as for all other bots, or similarly via the human takeover node.
If you need help with anything here, please email us at [email protected]!
Updated about 3 years ago
