Webhooks
Dynamically fetch content from 3rd party APIs into your bot
Don't have an Instabot account yet?
Instabot webhooks give you the ability to make a runtime GET request from your bot so you can programmatically populate the bot message, multiple-choice options, etc from data and content pulled in from any RESTful API. Instabot uses URL query parameters to send both GET, then parses out the JSON response that can be added to any node in a conversation.
What can you do with Webhooks in your conversation?
- a. a simple node message
- b. programmatic population of multiple-choice options
- c. programmatic population of images, descriptions and titles in rich-media cards
1. Configure your webhook
Build your first webhook:
- In the left-side menu, select Integrations, then *Webhooks**
- Click Add custom webhook
Now you can create your first webhook!
Instabot webhooks are HTTP methods that are used to alter conversation content dynamically based on the user's reply to a node. It uses requests in a query string format sent to any available URL endpoint configured to accept both GET and POST requests.

API URL Endpoint
Authentication can be done in the query URL or by adding authentication headers.
1a. Request parameters
These parameters will be used to capture the values from an Instabot conversation that should be sent to the webhook. For example, when the conversation asks for the user's ingredients, the value of the parameter will be set as the user's reply. This will be explained further below.
Request Parameter Name
It needs to match exactly with the parameter name that the API is expecting. If it does not exist, then the webhook will return an error.
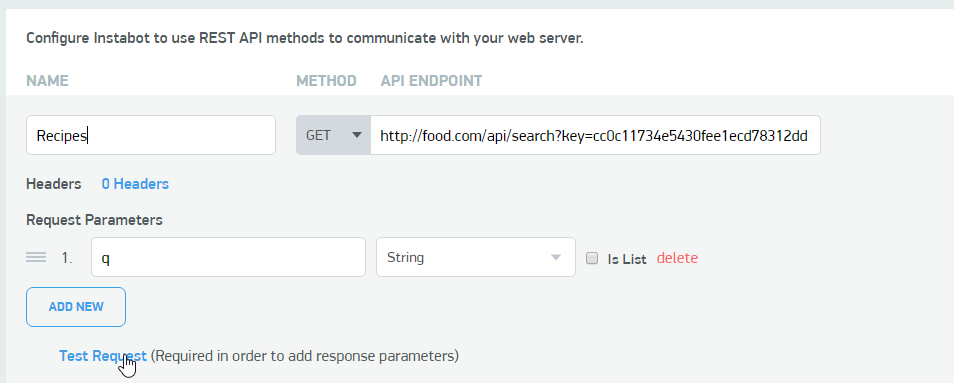
Configured Webhook
Make sure to add all of the required parameters that the API is expecting or it will return an error. Add any static parameters directly into the endpoint URL field. These are parameters that will not be set by the user's reply. (eg: add sorting or desired unit of measurement to the response)
1b. Test the Request
Test the request to make sure it is valid by entering values for the request parameters. The response will be returned in JSON format. You have successfully set up your webhook, but now need to create output parameters that can be used in your conversation.
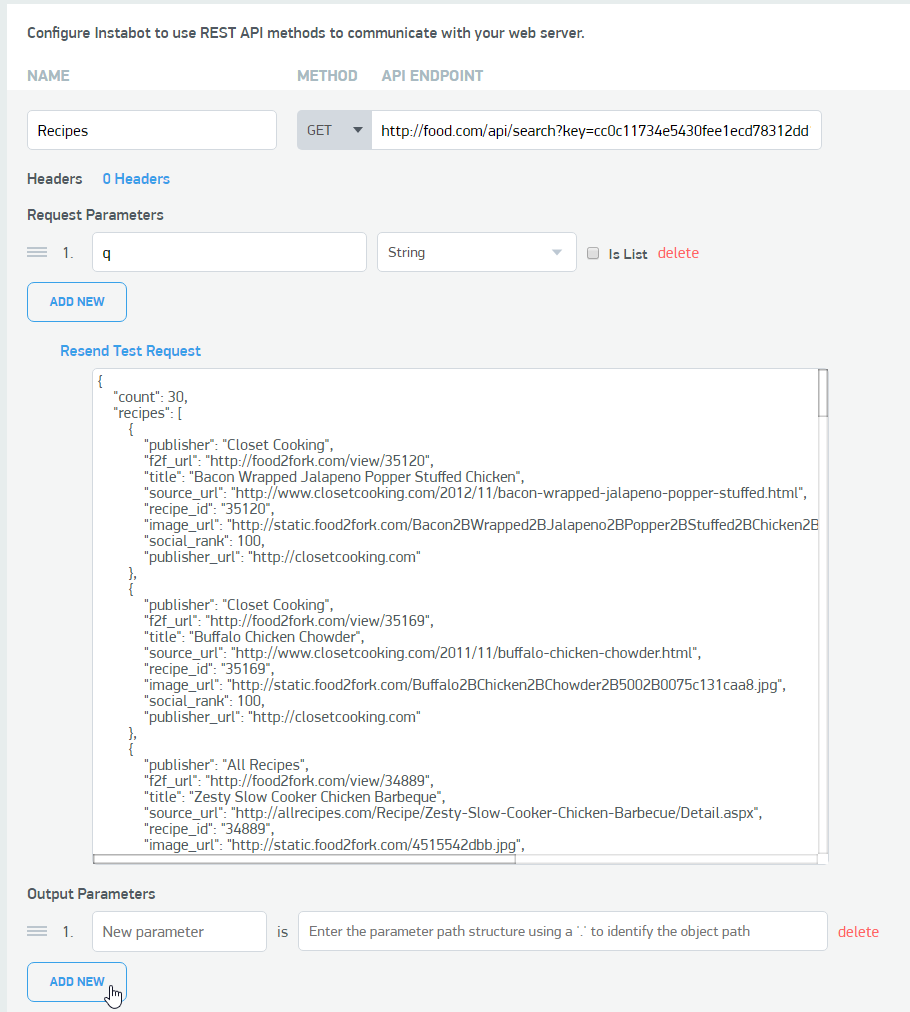
JSON Response
1c. Output parameters
Build output parameter mappings that will identify the key:value path of the desired content that you will ultimately want to use in a conversation.
In the Recipe example, we want to display the title of each recipe - this title field exist in every object of the recipes array. So let's name it "Recipe" and start typing the path from the JSON.
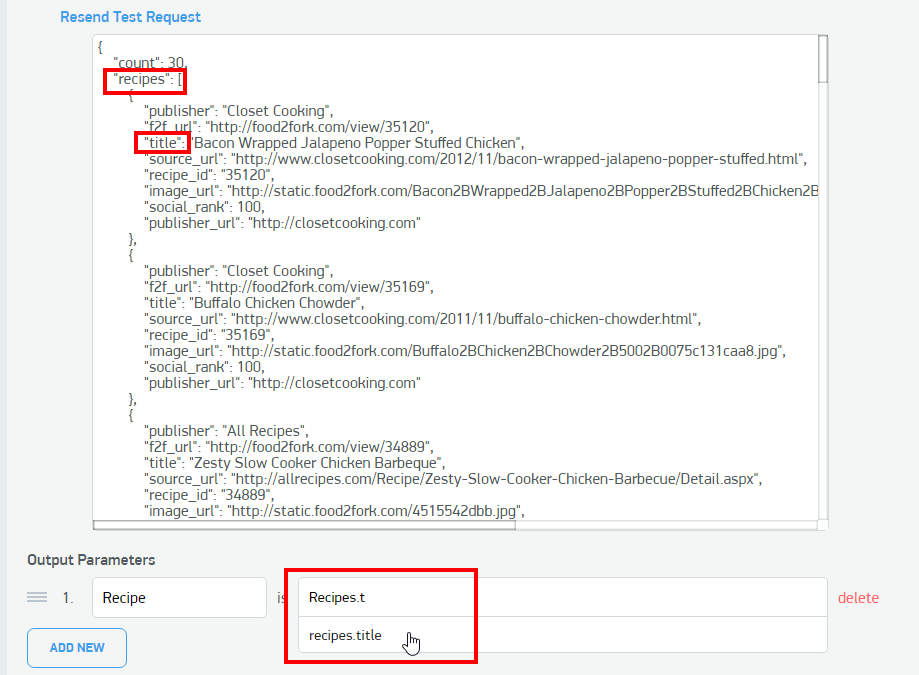
Add Output Parameters
Now when we add a webhook to our conversation, the [Recipe] placeholder will be replaced with the value from the JSON path recipes.title.
2. Add your webhook into your bot
Content that is fetched via webhooks can be inserted into the following node types:
- Message prompt (any node)
- Multiple-Choice Options
- Rich Media (image src, description, and title)
- External URL
Example syntax for a webhook that passes in 1 input parameter, and displays the value of an output parameter from that webhook
[=<webhookName>(<reqParam1>:<value1>).<outputParam>]
2a. Simple node message
Pending...
2b. Programmatic population of multiple-choice options
Below is an example webhook that takes a single input parameter (q), sets the value of q to the user's response to the node "ingredients" - and displays the field title from each object (up to 10) in the webhook payload.
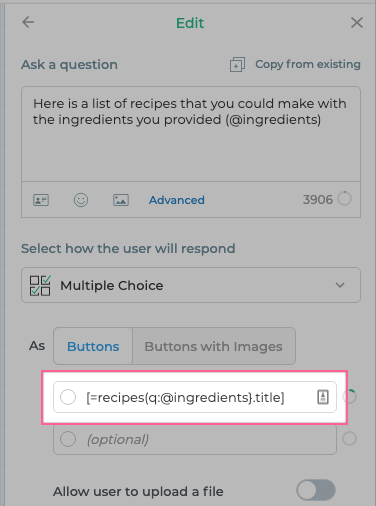
in bot-builder - example webhook that programmatically populates multiple-choice options
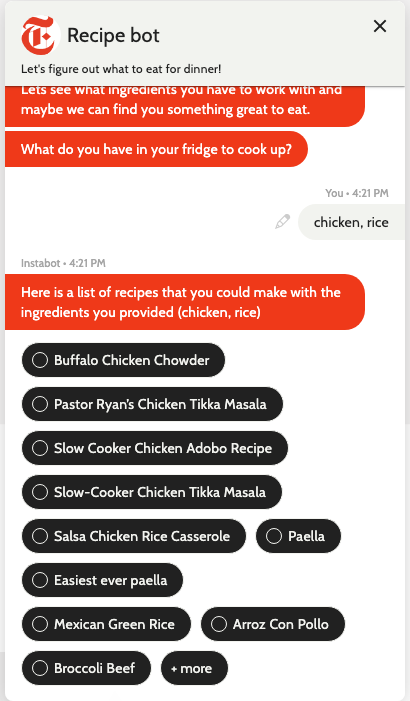
This is what your visitors would see in the bot - a list of recipes that are programmatically populated into each multiple-choice option using the above webhooks syntax.
2c. Programmatic population of images, descriptions and titles in rich-media cards
Pending...
3. Demo
Final product of our Recipe Bot
4. Syntax guide
More advanced webhook syntax
We offer some undocumented syntax that lets you do some really advanced webhook stuff - so if you don't find what you're looking for here, there's a chance we'll still be able to find a solution for you - email us at [email protected]
Below are the different syntax configurations and what data they will allow you to reference.
@nodename- use this syntax when you want to reference the user's answer from a specific/previous node - see here for more details[=WebhookName(RequestParam:ParamValue).OutputParam]- Call any webhook that has been configured and display the output parameter value.
- If the output parameter is an Array Object, then the first 10 objects will be returned.
- You can use both Static Text and dynamic text in the value of the request parameter by including the static text within quotes. (" ")
ex. [=WebhookName(RequestParam:"Static Text " @DynamicText).Output Param]
[=WebhookName(RequestParam:ParamValue).OutputParam.#]- Reference a singular index position of an array object.@NodeName.OutputParam- Call a stored parameter from an array object that was selected in a previous webhook node. (ex. Redirect to a URL from a Chicken Recipe selected in previous node)[=Image:OutputParameter]- Used only in Rich Media Cards. Will populate the image for each card with an Image URL. The output parameter must be a URL or the image will not display.
- Uses the output parameters list that match the webhook being called in the Option Name field of the rich media card.
[=Description:OutputParamter]- Used only in Rich Media Cards. Will populate the description filed with the string returned for the value of the output parameter.
- Uses the output parameters list that match the webhook being called in the Option Name field of the rich media card.
5. JS transformation functions
Supplementary JS is a new feature that allows for the insertion of arbitrary JavaScript between an API's raw data response, and what's actually displayed to the end-user in the bot.
For example, let's say you want to use an API that returns the current day and time, but the returned day and time is in UNIX format which is non-ideal to the end-user because the format of UNIX timestamps make them effectively unreadable by humans.
To solve this, you can insert intermediary JS to format UNIX timestamps so that they are human-readable to the end-user (example here).
Without supplementary JS:
- Your bot calls the whatTimeIsItNow() API
- The API returns the the current day/time in UNIX timestamp format - 1523367232
- The bot displays raw API response of "Current day and time is 1523367232" to the end-user
With supplementary JS:
- Your bot calls the whatTimeIsItNow() API
- The API returns the the current day/time in UNIX timestamp format - 1523367232
- A supplementary JS function converts the timestamp from UNIX format to human-readable format
- The bot displays the formatted API response of "Current day and time is 04/10/2018 @ 1:33pm (UTC)" to the end-user
This can be used with all APIs out there in the world:
- APIs you control - you can tweak the functionality of your API without actually modifying the API itself which carries the risk of breaking other services that are integrated and dependent on that API not changing
- 3rd-party APIs you do not control - you can tweak the functionality of an API without the 3rd party actually implementing that functionality themselves
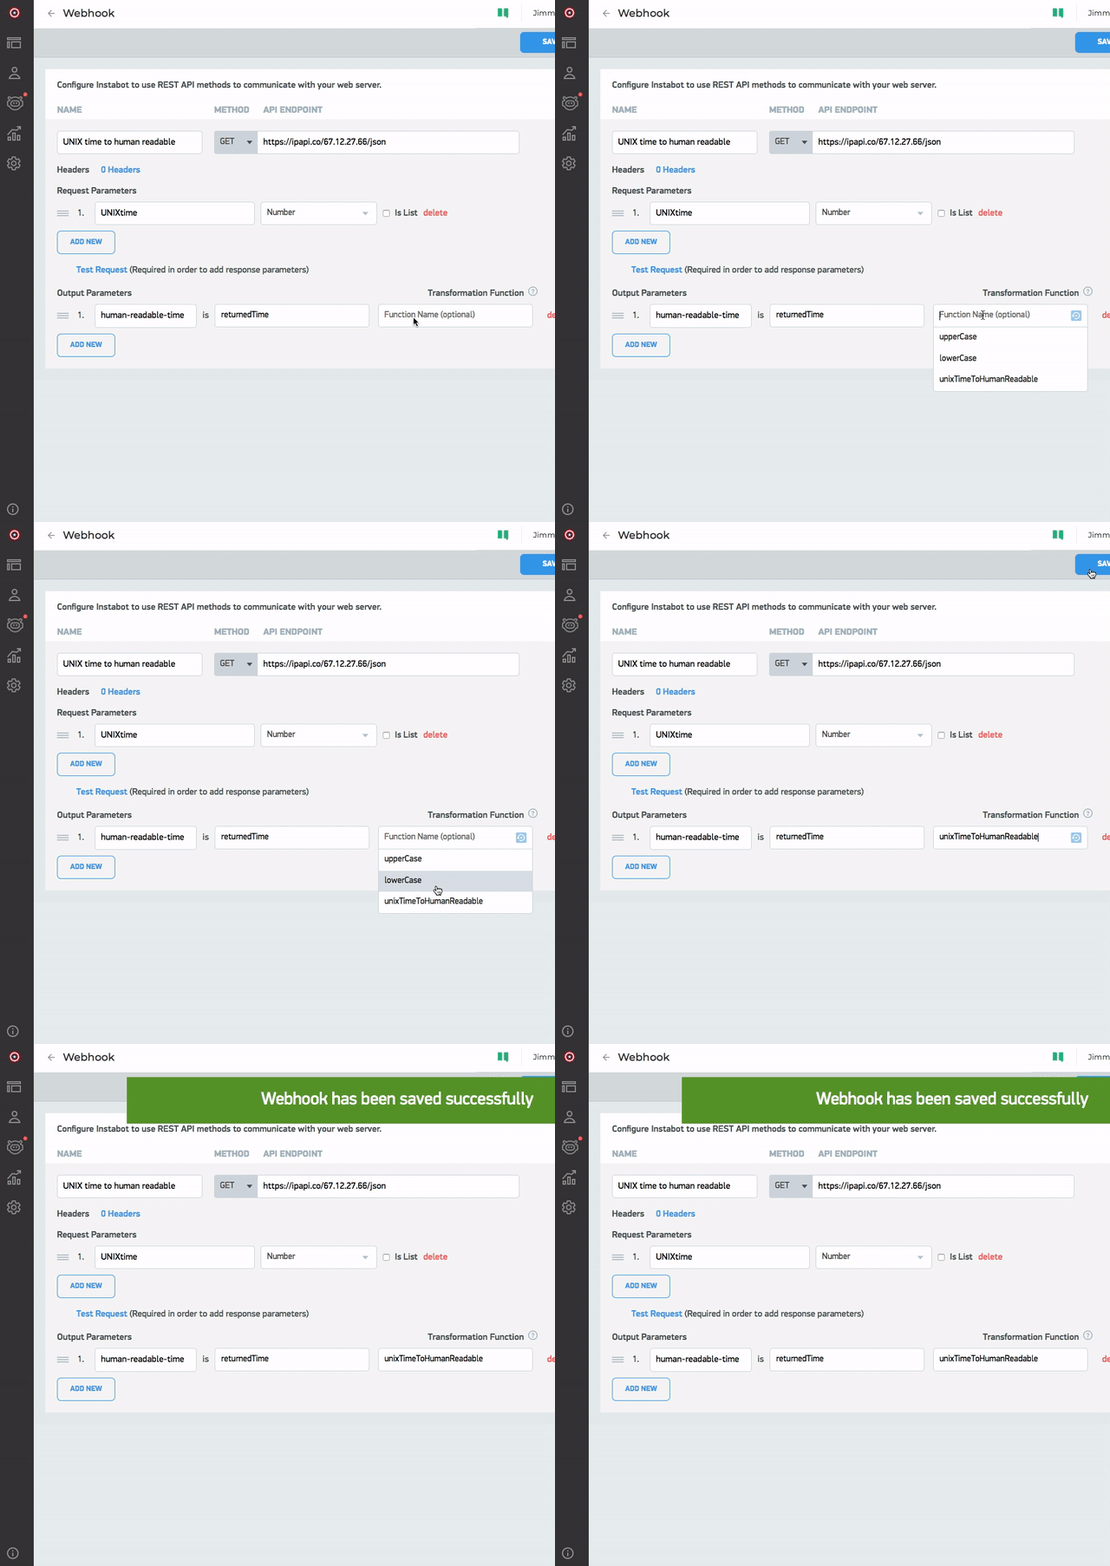
Select the JS transformation function that will be inserted between your webhook's response, and what's displayed in the bot
Updated over 6 years ago
