Advanced
Don't have an Instabot account yet?
This page will describe the advanced topics related to web Instabot.
Contents
- Custom CSS
a. via JavaScript
b. via portal upload
c. via Instabot microsite URL - Custom CSS best-practices
2a. Custom CSS of persistent button - Set a user's properties on Instabot launch
3a. via the JavaScript
3b. via URL parameters
3c. Instabot Microsite
1. Custom CSS
Custom CSS requires a developer
Please note that customizing your bot's appearance via custom CSS requires a developer. Due to the unique nature of each custom CSS implementation, we will not be able to help troubleshoot custom CSS stylesheets.
In addition to the Instabot-UI customization tools offered in the Instabot portal, we also offer the ability to override these settings with your own custom CSS file.
There are 3 ways of applying custom CSS files:
- a. programmatically loading it when the Instabot JavaScript loads
- b. manually uploading it directly in the Instabot portal
- c. programmatically loading it for the microsite
Keep in mind the following when using a custom CSS file:
- Custom CSS file must be hosted on an HTTPS host - eg:
https://dr.qa.rokolabs.com/via.css- When using custom CSS, all UI settings in the portal will be ignored. If you want to use custom CSS and keep the UI configured in the portal, you will need to migrate your portal UI settings settings individually, and manually into your custom CSS file
- Internal style sheets for custom CSS are not supported
a. Programmatically loading it when the Instabot JavaScript loads
To leverage a custom CSS file with a page-level Instabot JavaScript, use the cssUrl script parameter.
<!-- base web-Instabot JS snippet
  with optional launch options and customization -->
<script type="text/javascript" src="https://widget.instabot.io/jsapi/rokoInstabot.js" crossorigin>

    // replace with your own Instabot API key (required)
    apiKey: "Your Instabot API key",

    // path to your custom CSS file MUST be hosted via https (optional)
    cssUrl:"Your-CSS-file-hosted-via-https"

</script>
b. Manually uploading it directly in the Instabot portal
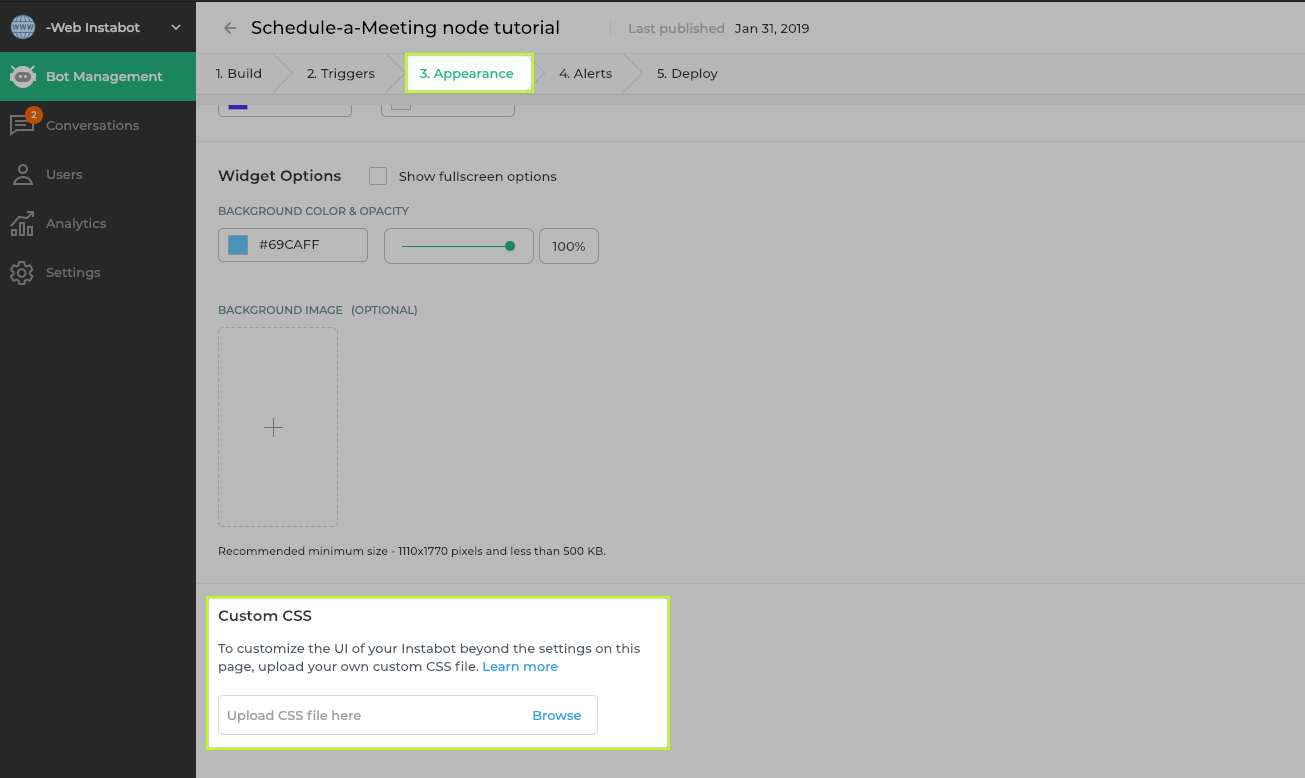
c. Programmatically referencing it for a microsite
To leverage a custom CSS file with a Instabot Microsite
https://microsite.instabot.io/IB-CONVERSATION-ID?cssurl=https%3A%2F%2Fdr.qa.rokolabs.com%2Fvia.css
2. Custom CSS Guidelines
This section describes some but not all of the many properties that can be configured through a custom CSS file.
Custom CSS requires a developer
Please note that customizing your bot's appearance via custom CSS requires a developer. Due to the unique nature of each custom CSS implementation, we will not be able to help troubleshoot custom CSS stylesheets.
Chat Body
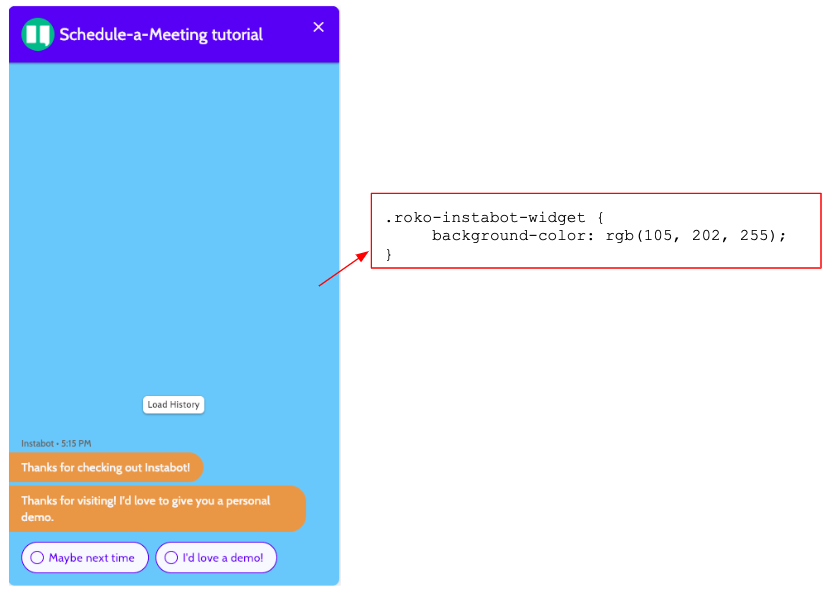
Chat Body
.roko-instabot-widget {
  background-color: rgb(105, 202, 255);
  font-family: Cabin, sans-serif;
  font-size: 14px;
  font-weight: 400;
}
Chat Header
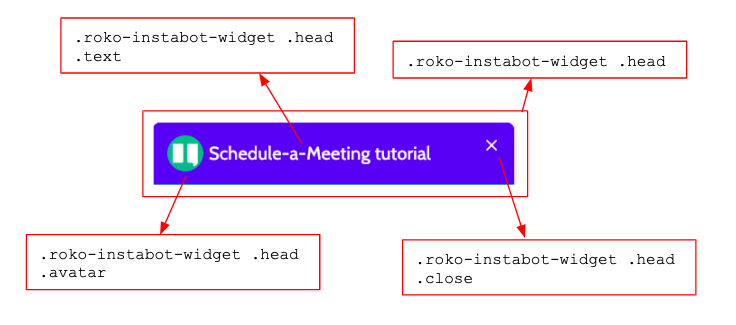
Chat Header
.roko-instabot-widget .head {
  z-index: 5;
  position: relative;
  padding-top: 14px;
  padding-right: 40px;
  padding-bottom: 14px;
  padding-left: 16px;
  background-color: rgb(78, 21, 255);
  color: rgb(248, 249, 255);
}
Message Text
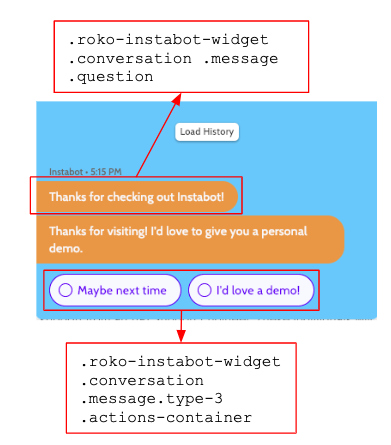
Message Text
.roko-instabot-widget .conversation .message .question {
  …
  position: relative;
  background-color: rgb(96, 96, 96);
  margin-bottom: 3px;
  border-radius: 5px;
  padding: 18px;
  margin-right: 50px;
  box-shadow: 0 2px 5px 0 rgba(0,42,112,0.2);
  …
}
User Response
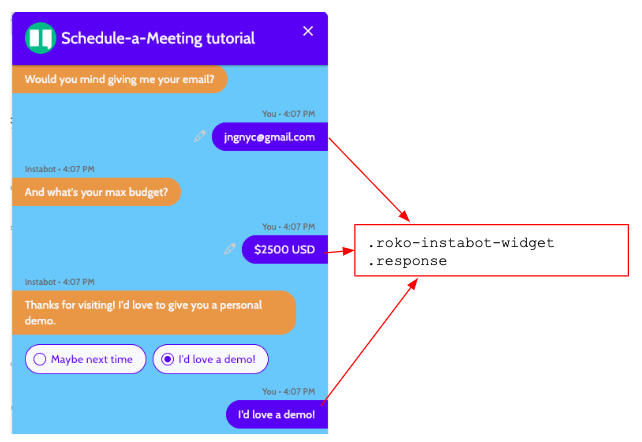
User Response
.roko-instabot-widget .response {
  …
  position: relative;
  display: inline-block;
  margin: 0 30px 15px 100px;
  background-color: rgb(56, 161, 233);
  color: white;
  border-radius: 5px;
  padding: 18px;
  box-shadow: 0 2px 5px 0 rgba(0,42,112,0.4);
}
Custom CSS of Persistent button
You can also upload your own custom CSS to achieve limitless UI customization of the persistent button, and Instabot widget in order to align with your brand. To upload custom CSS, open your conversation, navigate to the Appearance tab, then click "Upload CSS File"
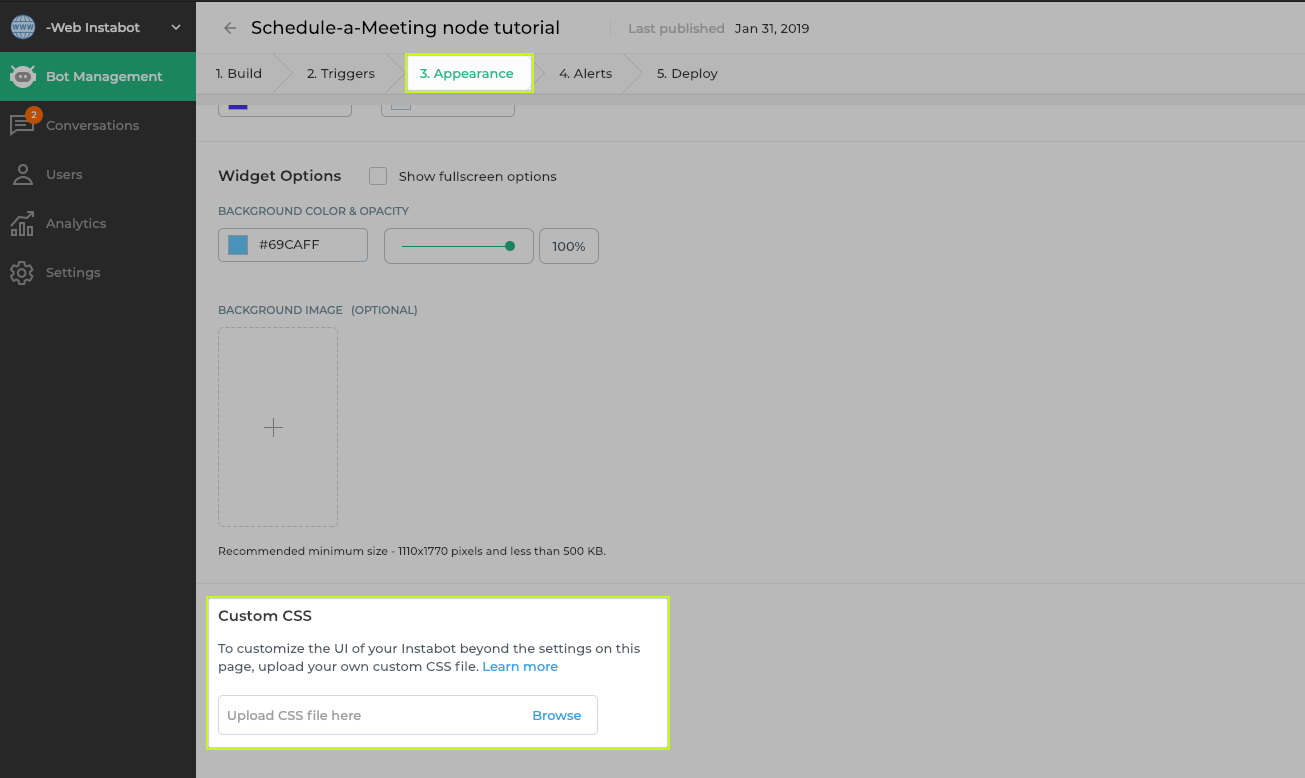
Upload custom CSS
Below is an example custom CSS file to customize the CSS persistent button, and the Instabot widget:
// example custom CSS that will customize the UI of the persistent button, *and* the Instabot widget

iframe.roko-instabot-widget {
  background: rgba(255, 255, 255, 0.5);
  background-image: none;
}

// CSS properties for the persistent button
.roko-instabot-widget-button {
    -webkit-box-shadow: 0 4px 20px 0 rgba(17,17,17,0.2);
    box-shadow: 0 4px 20px 0 rgba(17,17,17,0.2);
    position: fixed;
    border-radius: 10px;
    height: 120px;
    width: 60px;
    right: 20px;
    bottom: 20px;
    cursor: pointer;
    background-color: #fff000;
	}

// CSS props for the teaser message
.roko-instabot-widget.rokoinstabot-preview .conversation .message-container {
	background-color: Yellow;
}

.roko-instabot-widget-button .roko-instabot-widget-button-avatar {
			border-radius: 5px;
			background-color: rgb( 43, 184, 133 );
			background-image: url('url("https://roko-mobi.s3.amazonaws.com/09ee4caf-4d8e-41d7-a203-a98f279a3ccc/ca02fe84-c372-4370-8380-3527a735b873")');
			background-position: center center;
			background-repeat: no-repeat;
			box-shadow: 0 4px 20px 0 rgba(17,17,17,0.2);
			right: 20px;
			bottom: 20px;
			width: 100px;
			height: 100px;
			z-index: 2147483647;
			cursor: pointer;
		}

// CSS properties for the Instabot widget itself
.roko-instabot-widget .response {
  background-color: rgb(197, 27, 53);
  color: White;
}

.roko-instabot-widget .response .tail {
  border-left-color: rgb(197, 27, 53);
}

.roko-instabot-widget .conversation .message .question {
  background-color: rgb(36, 44, 255);
  color: White;
}

.roko-instabot-widget .conversation .message .question .tail {
  border-right-color: rgb(36, 44, 255);
}

.roko-instabot-widget .conversation .message .avatar {
  background-image: url('https://instabotdemo.roko.mobi/bell/bellperformance-logo.png');
}

.roko-instabot-widget .conversation .message .avatar::after {
  content: ""
}

.roko-instabot-widget .multi-select .options .option.selected,
.roko-instabot-widget.mobile-view.more .multi-select .options .option.selected,
.roko-instabot-widget .multi-select-mobile-options .option.selected {
  background-color: rgb(197, 27, 53);
  border-color: rgb(197, 27, 53);
  box-shadow: 2px 4px 20px 0px rgba(197, 27, 53, 0.6);
  color: White;
}

.roko-instabot-widget .conversation .message.type-3 .actions-container,
.roko-instabot-widget .conversation .message.type-4 .actions-container,
.roko-instabot-widget .conversation .message.type-3 .actions-container .action,
.roko-instabot-widget .conversation .message.type-4 .actions-container .action .card-action,
.roko-instabot-widget .conversation .message.type-4 .actions-container .action .card-box .card-info {}
3. Set a user's properties on Instabot launch
Depending on where you integrate your bot, you may already know details about a user when the bot launches. In this situation, you can set user properties at the time of bot launch.
Setting specific user properties of the user with page-level Instabot JavaScript
<script src="https://code.jquery.com/jquery-1.11.3.js">
    </script>
    <script type="text/javascript">
        function processStandardProperties(datasets) {
            datasets = datasets || {};
            var deferred = $.Deferred(),
                requiredProperties = [{
                    name: "email",
                    value: "[email protected]"
                }, {
                    name: "firstName",
                    value: "Joe"
                }, {
                    name: "lastName",
                    value: "Schmoe"
                }];

            if (requiredProperties.length) {
                $.when(RokoAPI.api.users.getUser(null, true)).then(function (userResult) {
                    var user = userResult.data,
                        doUpdate = false;
                    datasets.userData = user;
                    var requests = []
                    if (user) {
                        requiredProperties.forEach(function (property) {
                            if (property) {
                                var currentValue = user[property.name];
                                if (currentValue != property.value) {
                                    user[property.name] = property.value;
                                    requests.push(RokoAPI.api.users.updateUserProperty(null, property.name, property.value));
                                }
                            }
                        });
                    }
                    if (requests.length) {
                        $.when.apply($, requests).then(function () {
                            deferred.resolve();
                        });
                    } else {
                        deferred.resolve();
                    }
                });
            } else {
                deferred.resolve();
            }
            return deferred.promise();
        }
    </script>

    <script type="text/javascript" src="//widget.instabot.io/jsapi/rokoInstabot.js" crossorigin>
        apiKey: "INSERT YOUR API KEY", launchActions: [processStandardProperties]
    </script>
Setting specific user properties of the user via URL parameters
You can set and pass in custom user-properties via the URL:
eg: instabot.io?ib:age=36&ib:nickname=coolguy
See here for full info - https://docs.instabot.io/docs/marketing-attribution#section-2-custom-marketing-attribution-parameters
You can also use this method to set user-property values via URL parameters for the conversational landing page
Identifying the user with the conversational landing page - 'username' URL parameter
To identify the user when the Instabot launches with a Instabot microsite, use the username URL parameter.
// launching IB directly with optional customization and launch parameters
https://microsite.instabot.io/[email protected]
Currently, only setting of 'username' at the time of launch with the conversational landing page
Updated about 2 years ago
