Launch on a button click
Don't have an Instabot account yet?
Overview
There are many ways of launching an Instabot in your website.
This guide will show you how to launch Instabot when a certain user-driven event occurs. This method is ideal for use-cases like:
- when the user clicks a button on your webpage
- when a user interacts with an embedded video player (eg: pause, stop, play)
To do this, we will do three things:
- Set up an event-trigger for your conversation in the Instabot portal
- Configure the Instabot JavaScript
- Attach your button's "click" to the Instabot event-trigger
Contents
- Set up an event-trigger for your conversation
- Build the Instabot JavaScript
- Attach the Instabot JavaScript to the button click
Prerequisites
1. Set up an event-trigger for your conversation
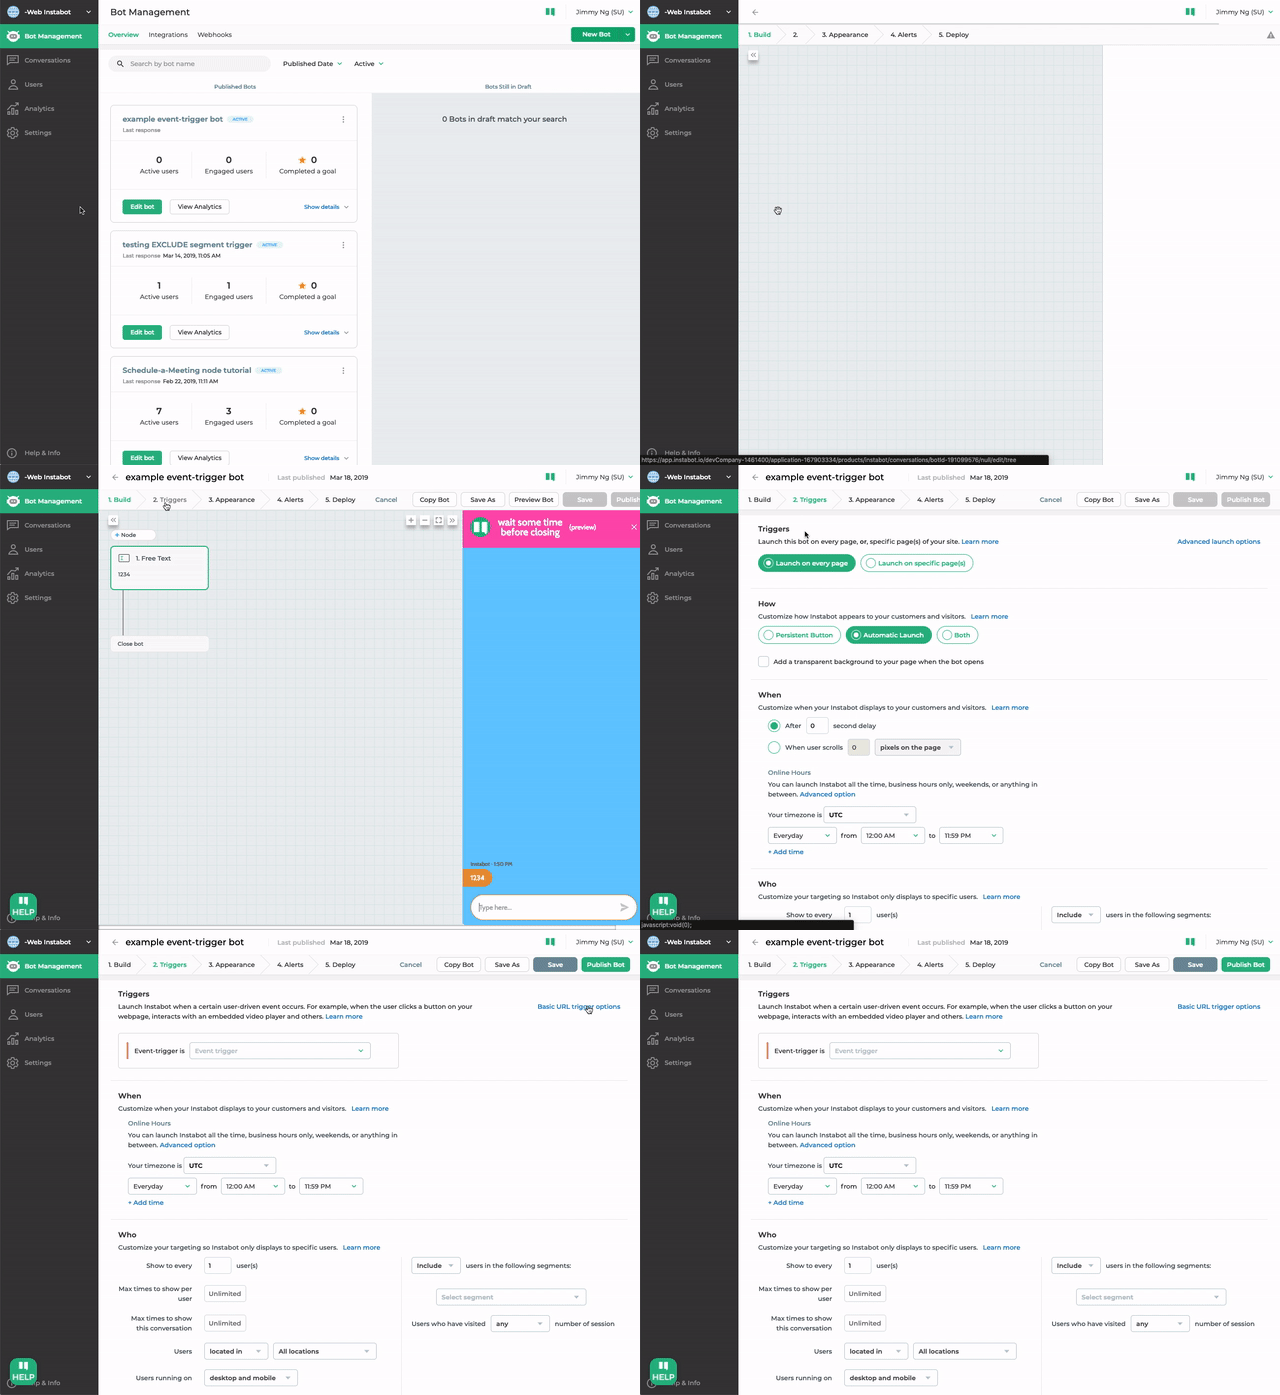
- To start, let's create and assign your Instabot event-trigger to your conversation. Open your Instabot conversation, click
Edit, selectTriggers, then switch to theAdvanced launch options

Advanced launch options
Advanced launch optionsallows you to configure the specific button-click or event that will trigger this bot.
On this page, you can either select an existing event-trigger, or create a brand new one. in this example, let's create an event-trigger called need-help-button-click.
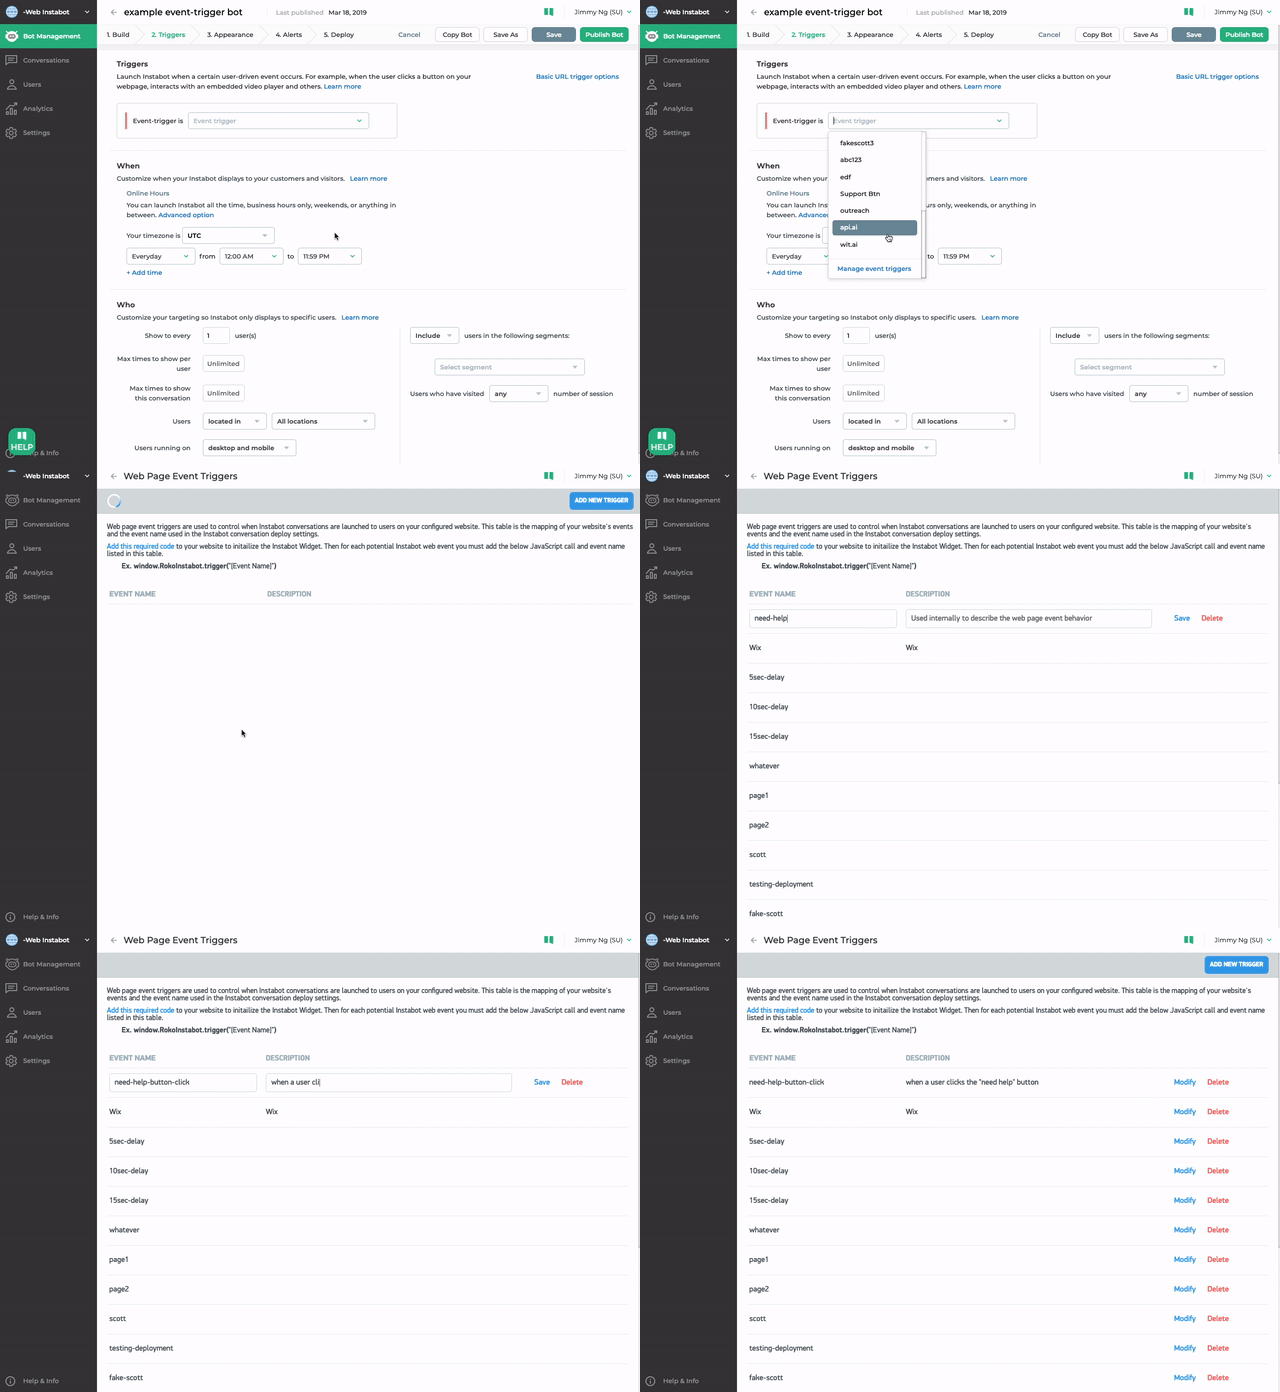
Start by clicking Manage Event Triggers at the end of the event-trigger list. A new window will open, and here, you will create your new event-trigger.

Create a new event-trigger
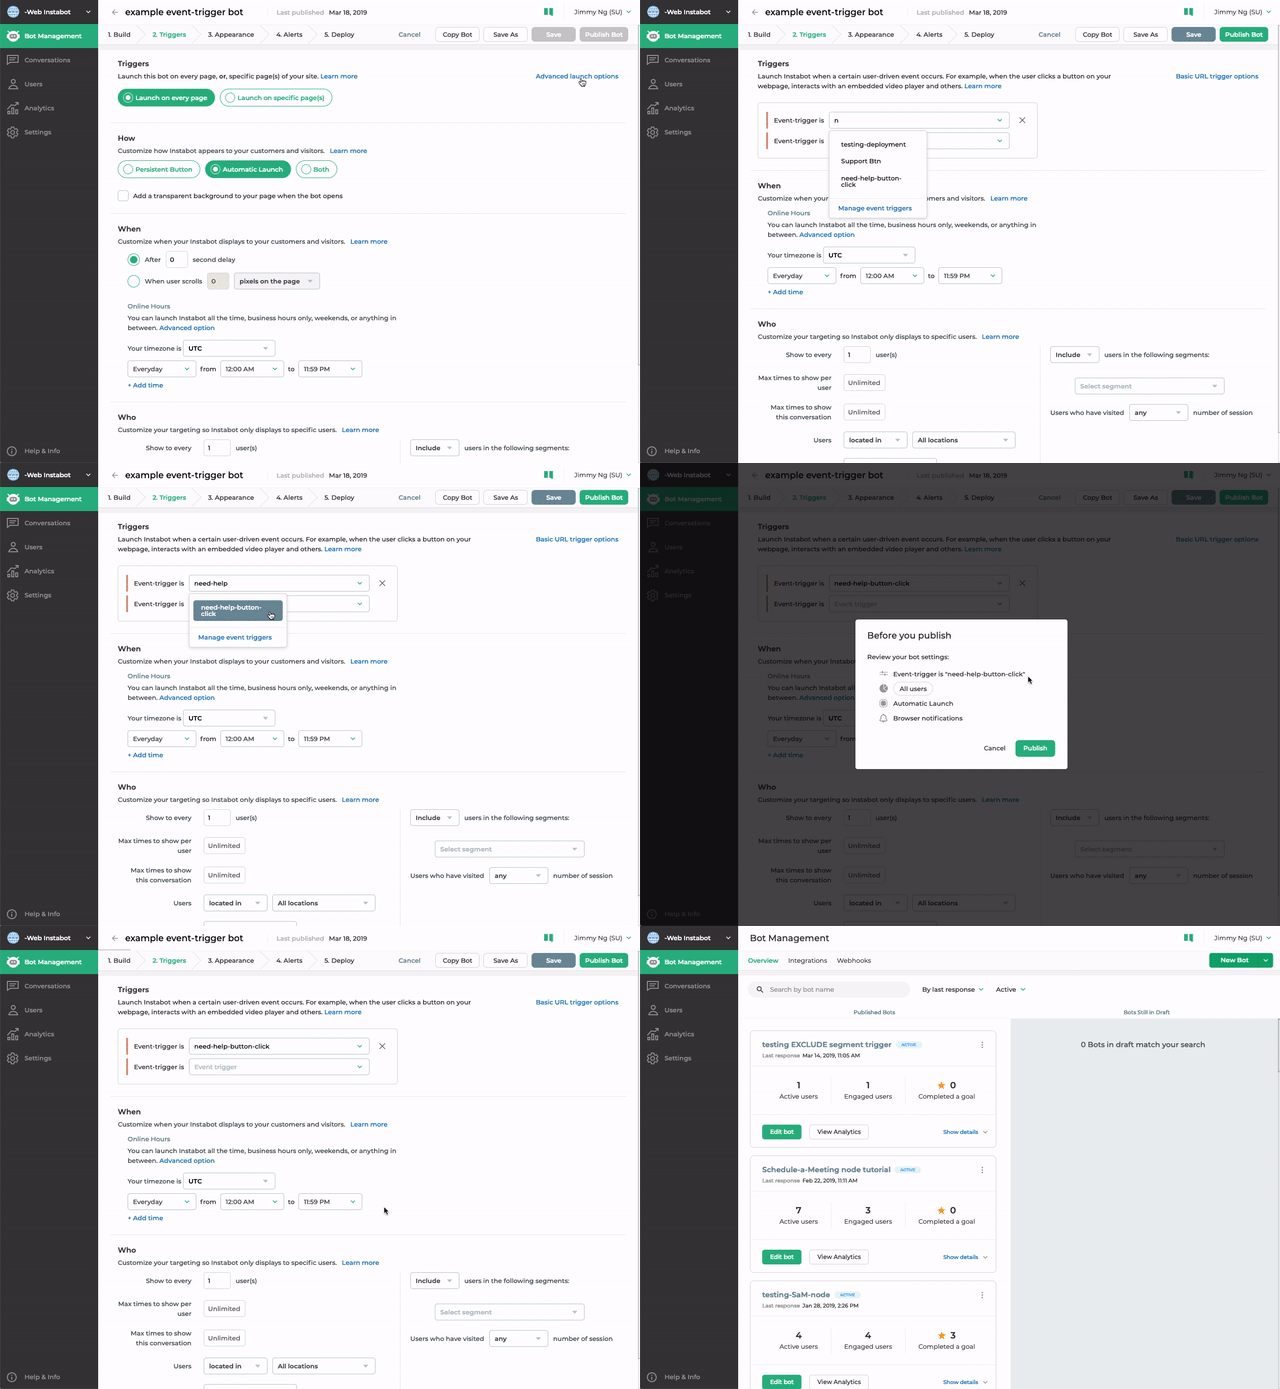
- Go back to the page you came from, refresh it, and then select newly created event-trigger from step #2. Now click Publish Bot.

Select the new event-trigger, and publish
That's it! Now we're ready to create the Instabot JavaScript snippet.
2. Build the web Instabot snippet
- In the Instabot JavaScript snippet below, replace the following value with your value:
apiKey- Your Instabot API key
IMPORTANT - Multiple Instabots on a single page
If you are integrating multiple Instabots onto a single page, you must take caution when adding the Instabot JavaScript into your page.
- this script block should be inserted into your page once
- the script block in step 2 should be inserted into your page for as many Instabots you have on your page (eg: if you have 5 buttons that launch 5 different Instabots, you should insert script step 2 into your page 5 times)
<!-- base web-Instabot JS snippet -->
<script type="text/javascript" src="https://widget.instabot.io/jsapi/rokoInstabot.js" crossorigin>

    // replace with your own Instabot API key (required)
    apiKey: "Your Instabot API key"
</script>
- Define a new function with a second
<script>block that will be called when the desired user event occurs.
In this case, we will define a function called needHelpButtonClick() that will be contained in this new <script> block. This function will be called when a user clicks the 'I need help' button
needHelpButtonClick()function nameNote the exact name of the function that you've assigned to
window. This function name will be important in the next section when we attach your button "click" with this function.
- In the new function you just defined, replace the following value with your value:
window.RokoInstabot.trigger- The Instabot event-trigger attached to your conversation in the previous section
<!-- this Instabot event-trigger function will be called when
the user clicks a button -->
<script type="text/javascript">
    window.needHelpButtonClick = function() {

        // this event-trigger must match what you configured in the portal
        window.RokoInstabot.trigger("YOUR-specific-conversation-event-trigger")
    }
</script>
IMPORTANT
Make sure the value in
window.RokoInstabot.triggeris set to the name of the event trigger you configured in section 1.In this case, make sure you replace
YOUR-specific-conversation-event-triggerwith the exact event-trigger that you configured in section 1.
3. Attach the Instabot JavaScript to the button click
In this section, we will bind the web Instabot JavaScript snippet that we built in the previous section, to the specific user-initiated element on our webpage. In this example, we'll use a simple simple button, that when clicked, will be binded to the web Instabot snippet.
- Let's use the below snippet for this example.
onclick
Note the function assigned to the button's
onclick- this will be important in a few stepsIn this simple code sample, we are calling the Instabot event-trigger when a user clicks a button by leveraging
button onclickThis basic framework can be extended to any user-initiated event you want by attaching the Instabot event-trigger to any user-action callback you want - eg:
<HTML-element-that-the-user-interacts-with specificUserActionCallBack = "your-instabot-event-trigger-function-name()"/>
<button type="button" onclick="needHelpButtonClick()">
  I'm confused about your different subscription plans. I need help!!
</button>

<!-- OR if you are using a regular <a> anchor tag -->

<a onclick="needHelpButtonClick()">
  I'm confused about your different subscription plans. I need help!!
</a>
- Your webpage's source code should now include 3 Instabot elements:
- base Instabot JavaScript
- the function containing the Instabot event-trigger (eg:
needHelpButtonClick()) - a UI element that when interacted with, will call the Instabot event-trigger function (
needHelpButtonClick()in this example)
<!-- header of your webpage -->
<!-- body of your webpage -->

<!-- base web-Instabot JS snippet -->
<script type="text/javascript" src="https://widget.instabot.io/jsapi/rokoInstabot.js" crossorigin>

    // replace with your own Instabot API key (required)
    apiKey: "Your Instabot API key"
</script>

    <!-- this Instabot event-trigger function will be called when the user clicks a button
 note this is just an example function! -->
<script type="text/javascript">
    window.needHelpButtonClick = function() {

    // trigger must match the conversation's event-trigger in the portal (required)
    window.RokoInstabot.trigger("instabot-pricing")
    }
</script>


<!-- your webpage content
 ...
 ...
 -->

<!-- user-initiated button click that will call the Instabot event-trigger -->
<button type="button" onclick="needHelpButtonClick()">
  I'm confused your different subscription plans
    </button>
Updated over 5 years ago
