Dialogflow
Don't have an Instabot account yet?
Dialogflow node requires Standard tier and up
Using advanced functionality in Instabot such as the Dialogflow node requires your Instabot account to be on the Standard tier or higher.
To upgrade to the Standard tier, click here, or emails [email protected]!
Contents
- Overview
- Connect your Dialogflow account to Instabot
- Add Dialogflow into your bot
- Advanced
4a. Do not display the text responses from Dialogflow itself
4b. Route the user to different paths in the bot if Dialogflow returns the Default Fallback Intent
4c. Access the full JSON payload returned by the Dialogflow node
4d. "Separate branches" vs "Single branch" mode
1. Overview
The Dialogflow node incorporates Google's Natural Language Processing (NLP) and machine learning expertise directly into your bot to provide your users rich, natural language comprehension in free-text nodes.
Dialogflow can be useful for responding intelligently to a user's free-text, natural-language requests such as "how much does your product cost?"
Below is our own bot that uses Dialogflow to handle free-text questions - we use this bot on our main marketing site instabot.io! Test it out yourself!
In this tutorial, we will build a very simple bot that will:
- ask the visitor a question
- send that question to Dialogflow and display Dialogflow's response directly back to the user!
Let's get started!
2. Connect your Dialogflow account to Instabot
To connect your Dialogflow NLP agent to Instabot, retrieve and upload your Dialogflow service account key.
-
Log into the Dialogflow console
-
In the top-left, find the specific agent you want to connect to Instabot, click the gear icon to open the agent's settings page, then under find and click on Project ID
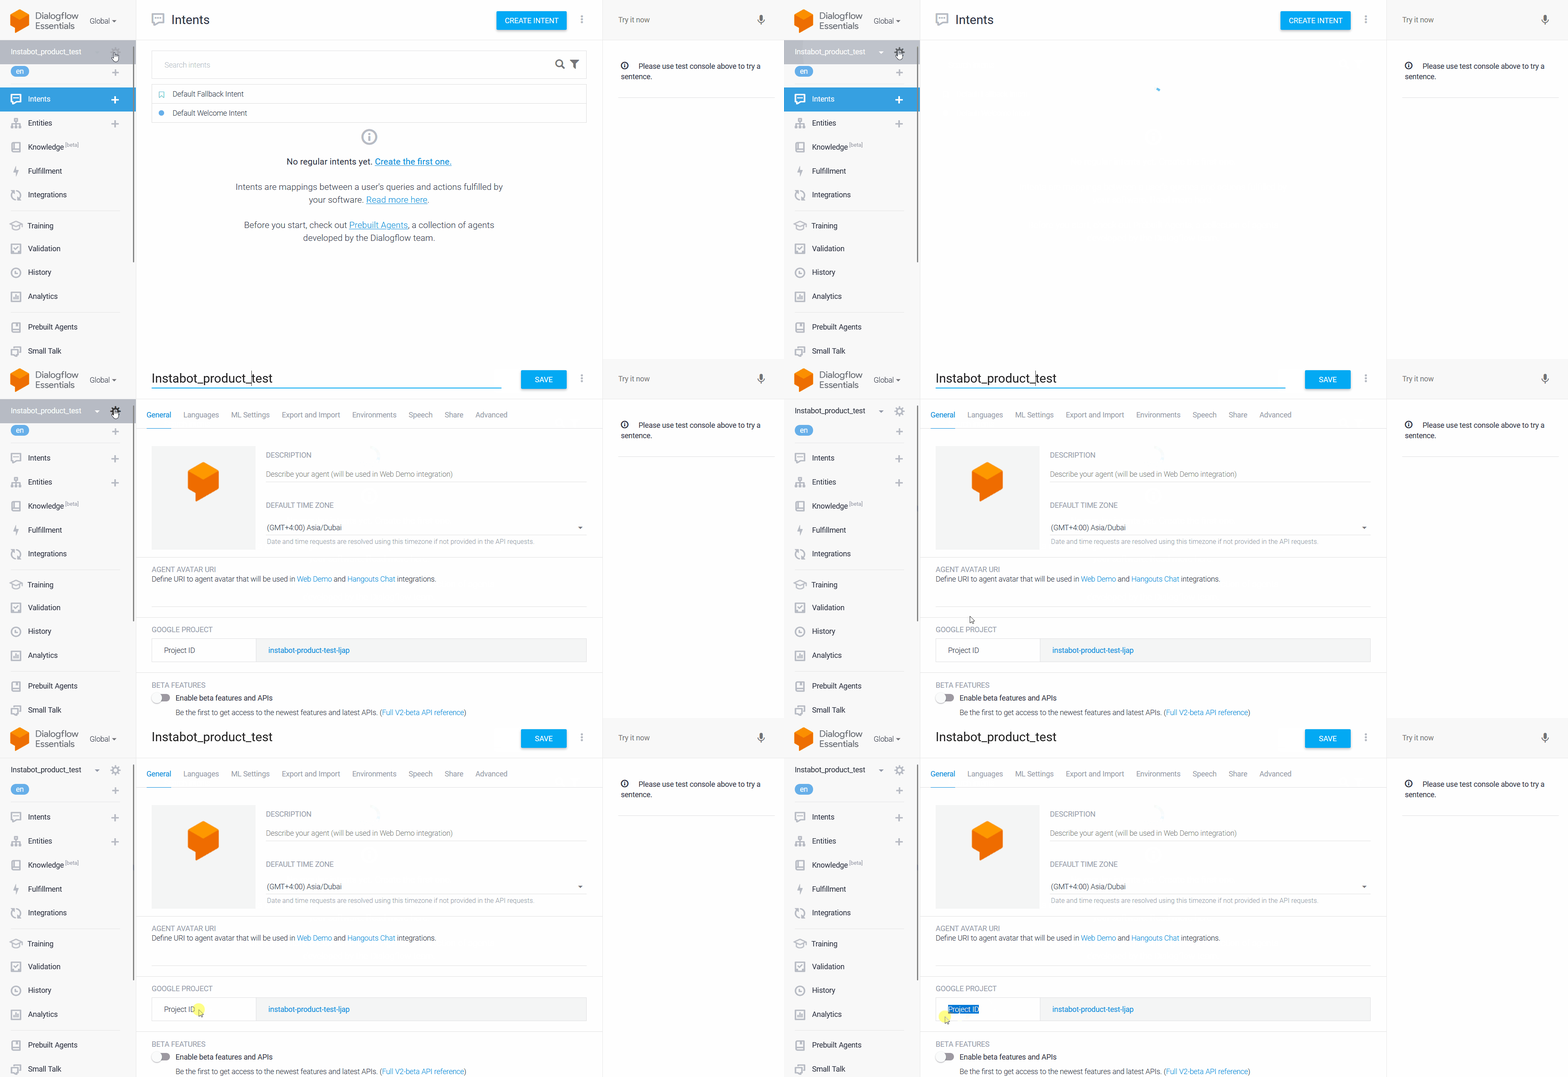
Project ID
- Go to IAM & Admin -> Service Accounts
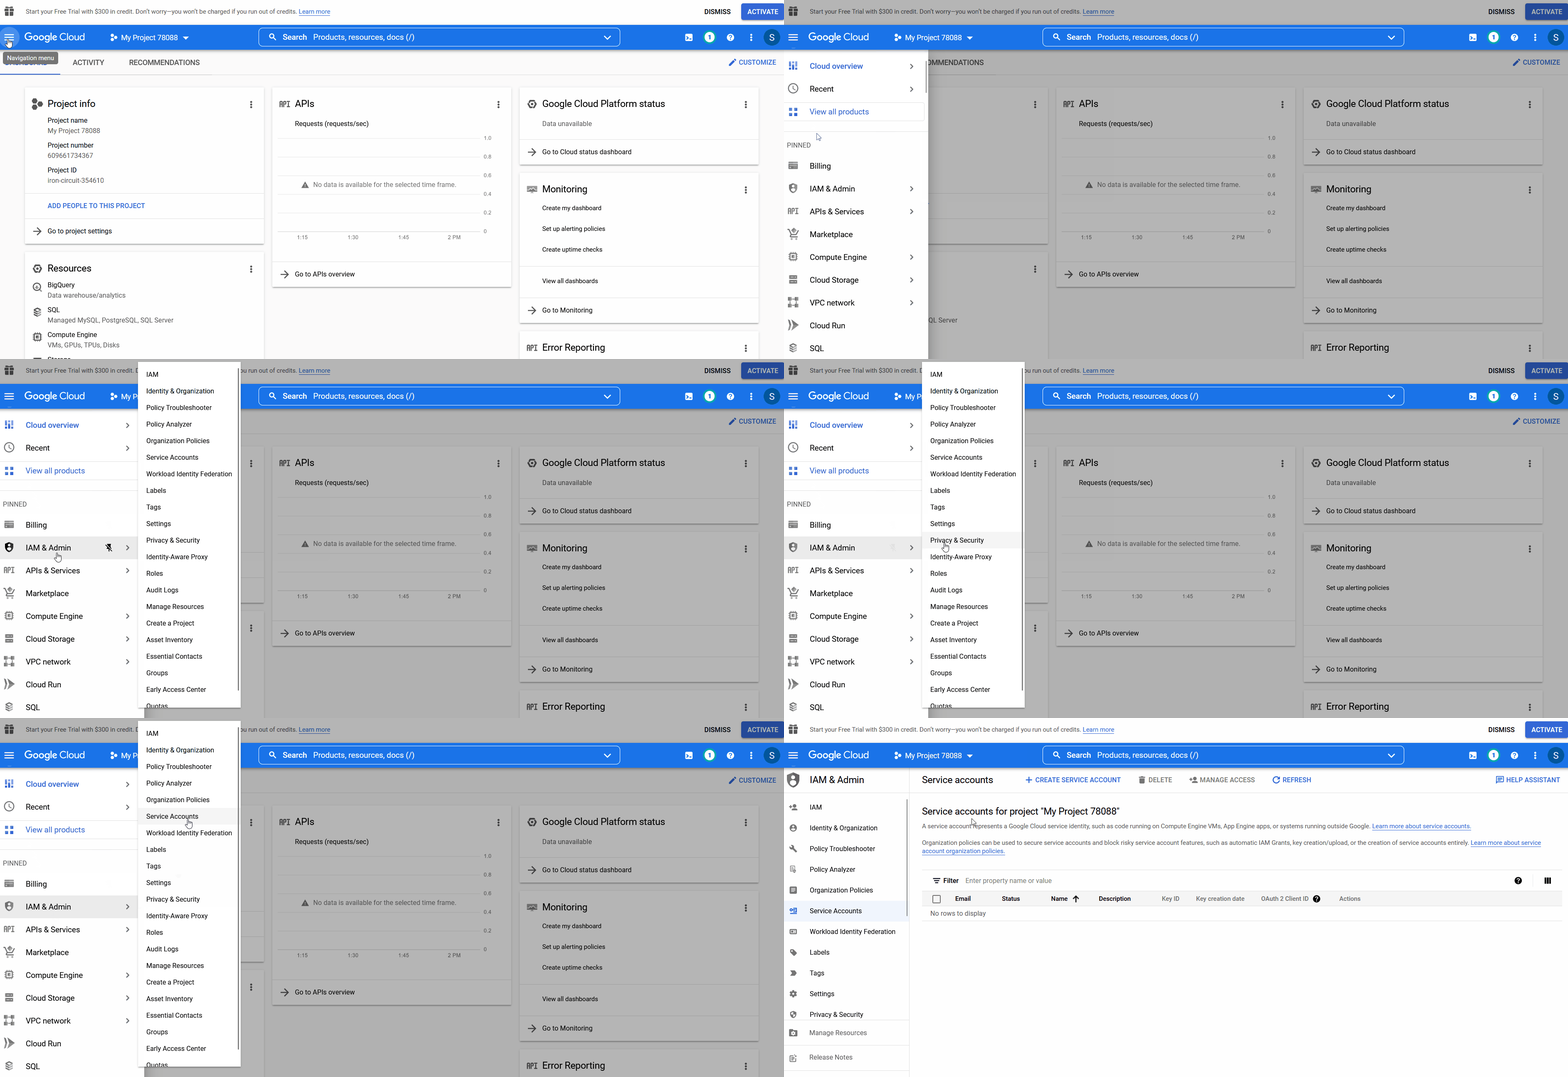
Service accounts
- Click "+ Create Service Account"
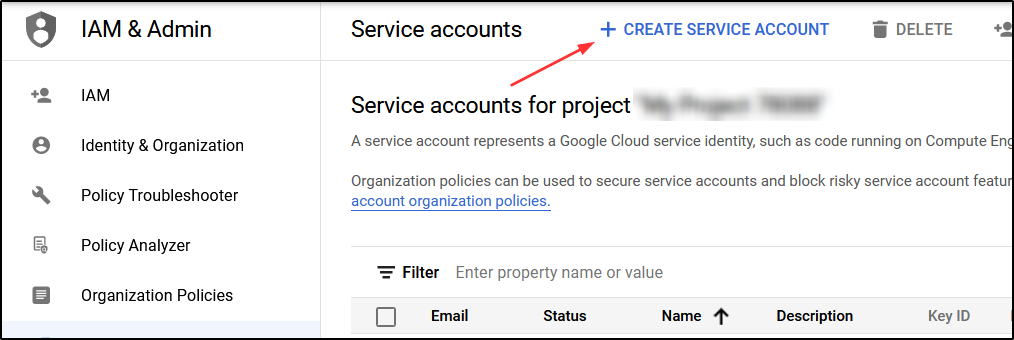
Create service account
- Enter desired name, service account ID and click "Create and Continue"
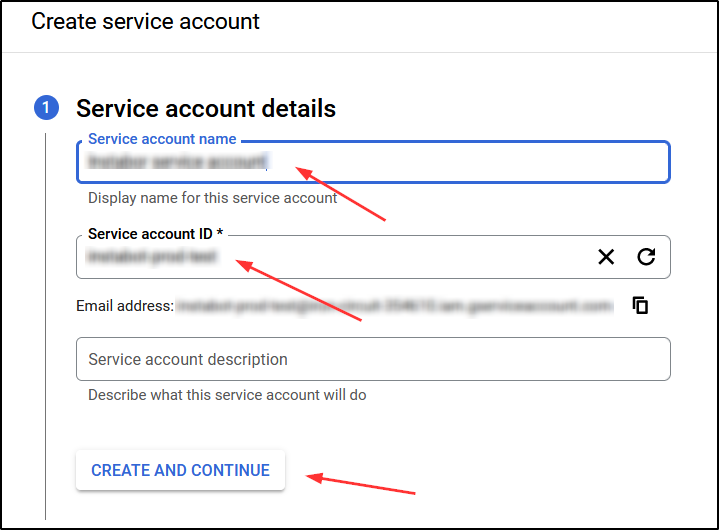
Name and service account ID
- In "Select a role" dropdown find and select "Dialogflow API Admin" role. Click "Continue" then "Done".
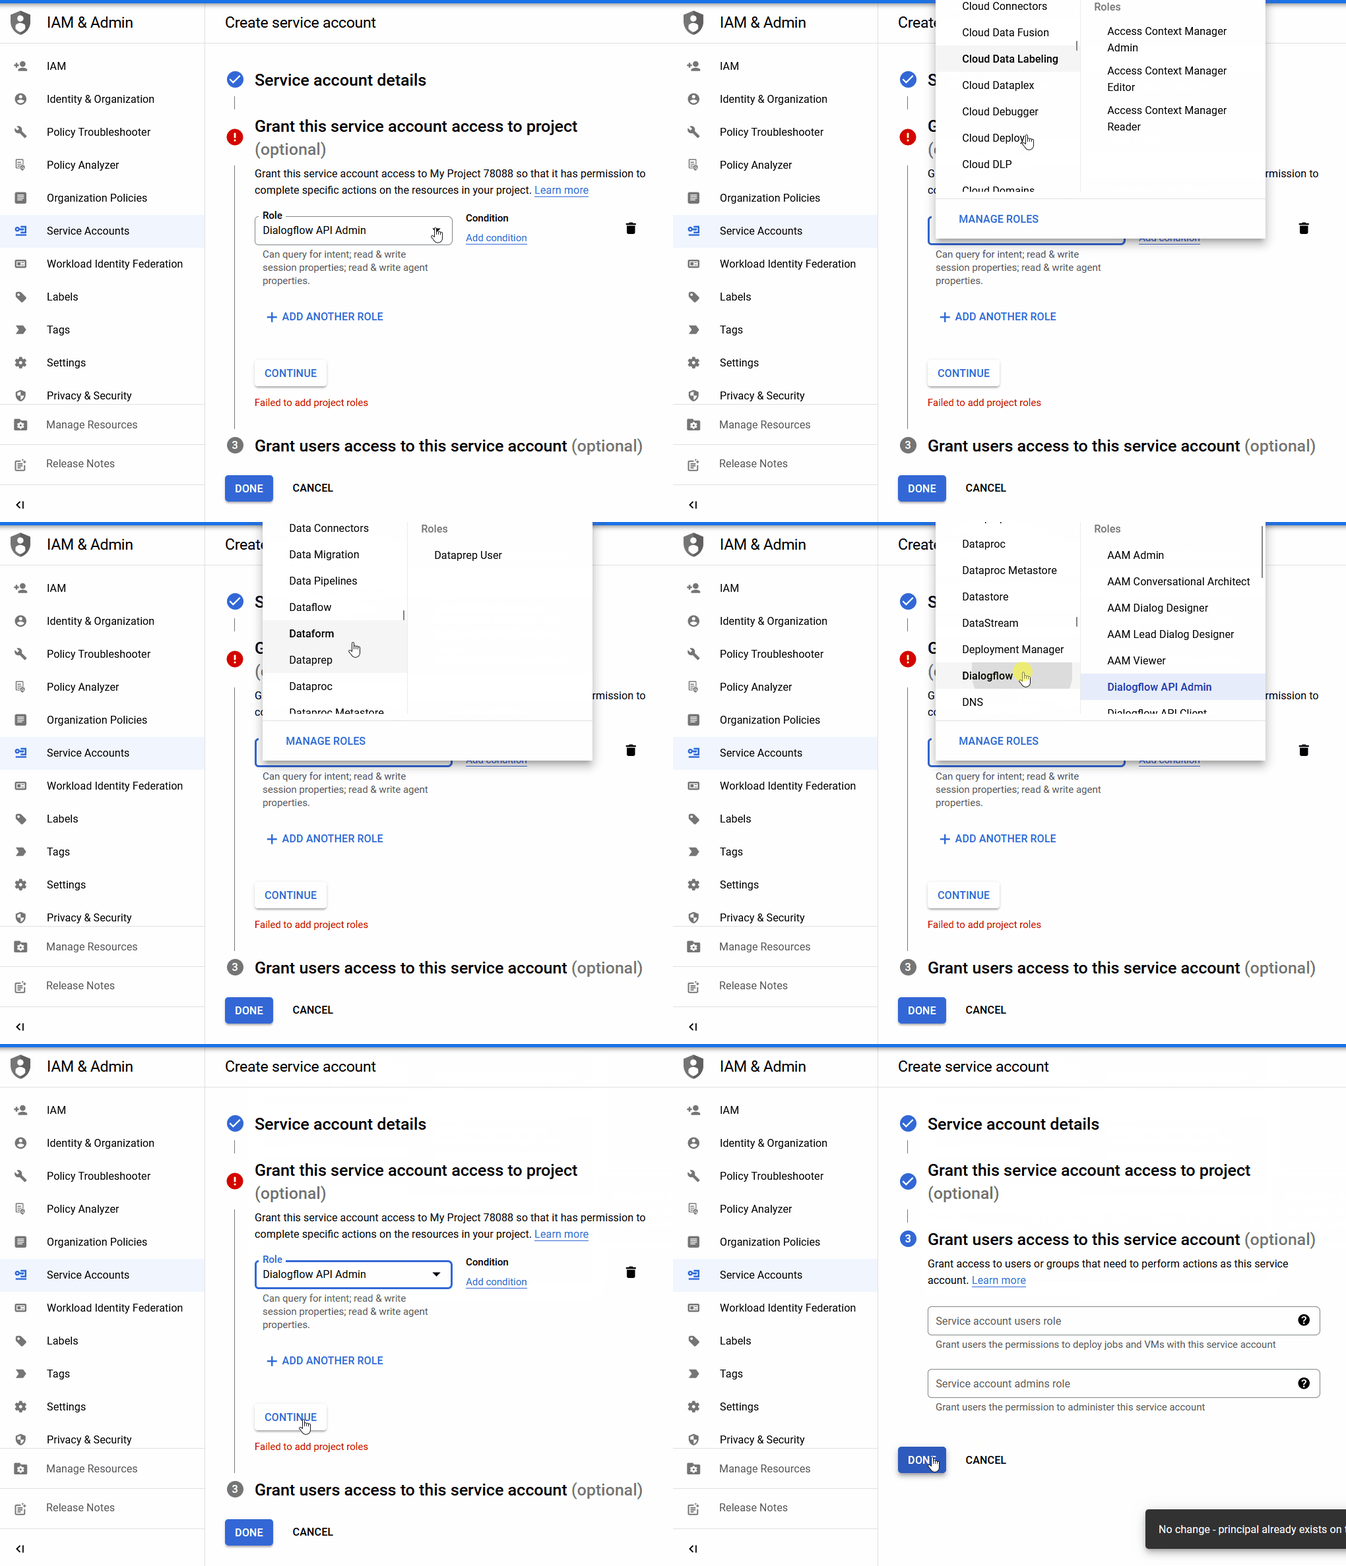
Add a role
- Click on your created service account in the table.

Click on your service account
- Go to Keys -> Add Key -> Create new key -> JSON -> Create.
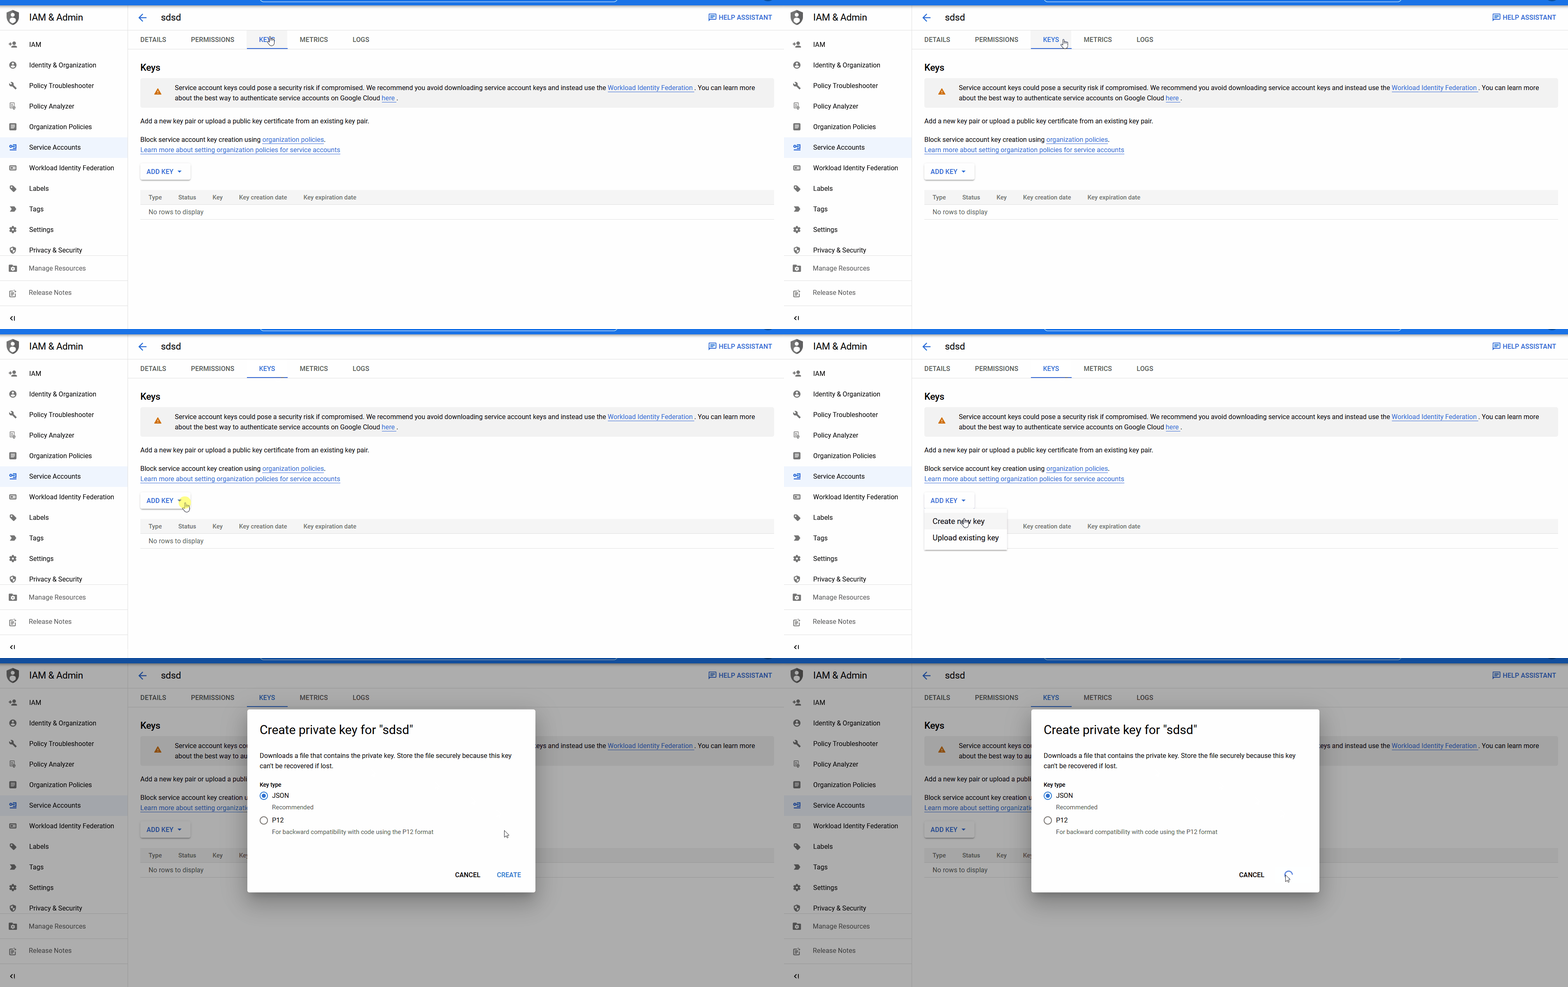
- Upload the key into your Dialogflow integrations page
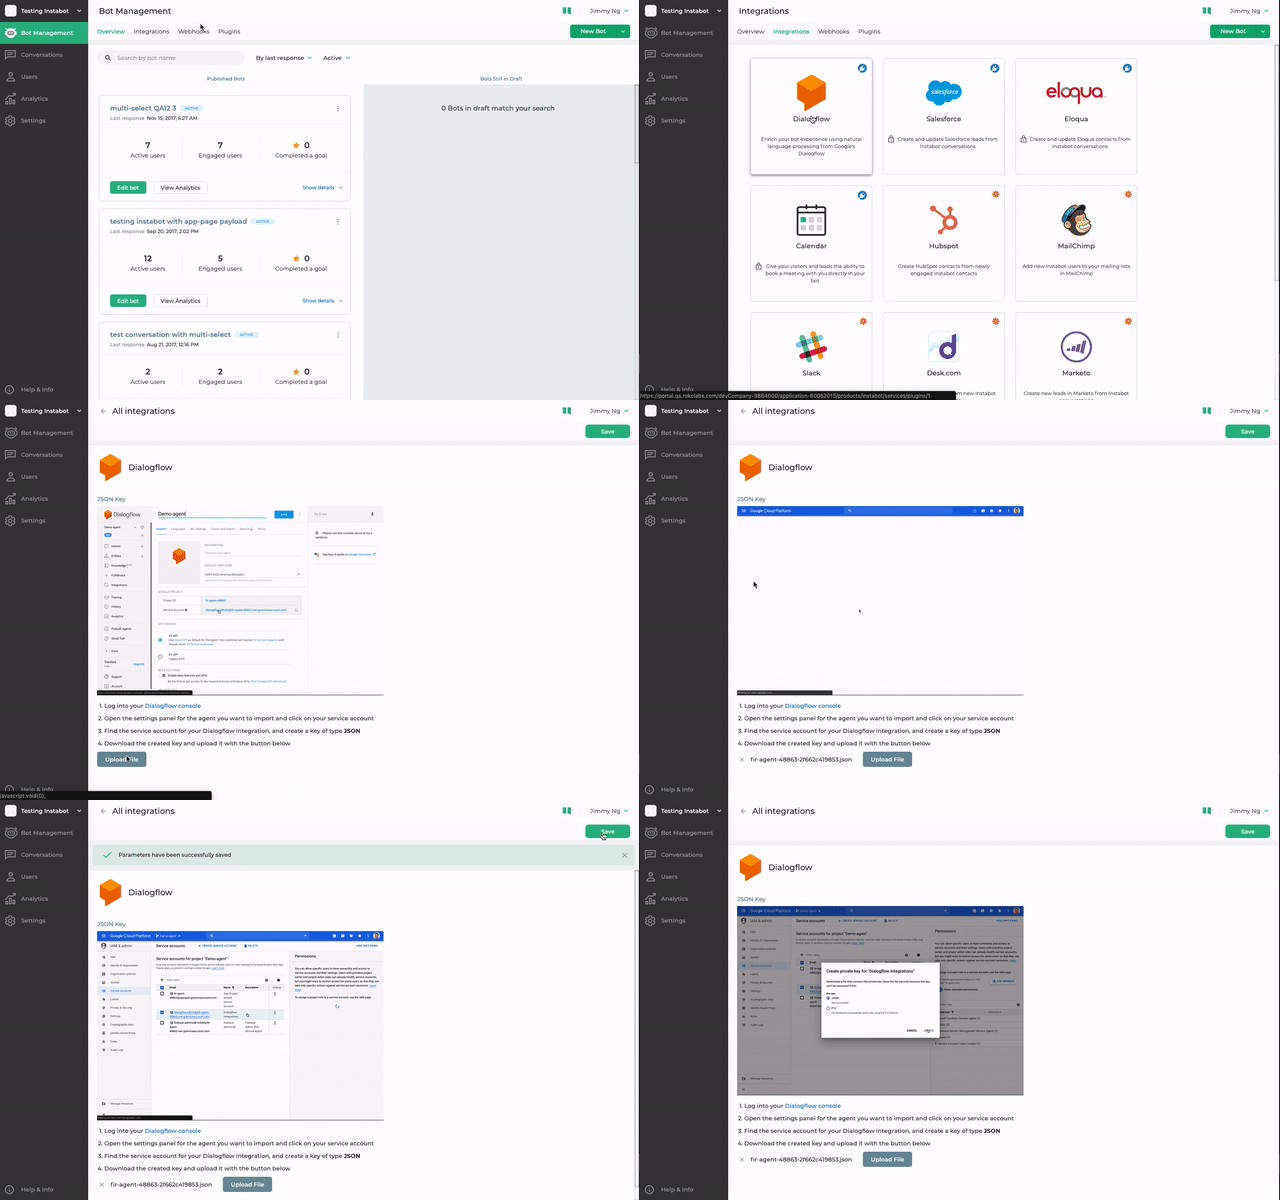
Upload your JSON key
- Lastly, make sure you click "Save" in the top-right corner.
Now you're ready to add Dialogflow into your bot!
3. Add a Dialogflow node into your bot
Now that you've connected your Dialogflow account, we're ready to add Dialogflow into your bot! Using Dialogflow in your bot requires a minimum of two things:
- a free-text node - this node will ask the visitor what their question is
- a Dialogflow node - this node will send the visitor's question to Dialogflow and then display Dialogflow's response back to the visitor
- Add a free-text node to ask the visitor for their question, and click "Add Node"
Name this node
It's critically important to name this free-text node in a very specific way. We strongly suggest naming this node "user-question".
If you want to use your own name, do not use spaces or dots in your node name, use dashes to separate words in your node-name instead (eg: "ask-visitor-something")
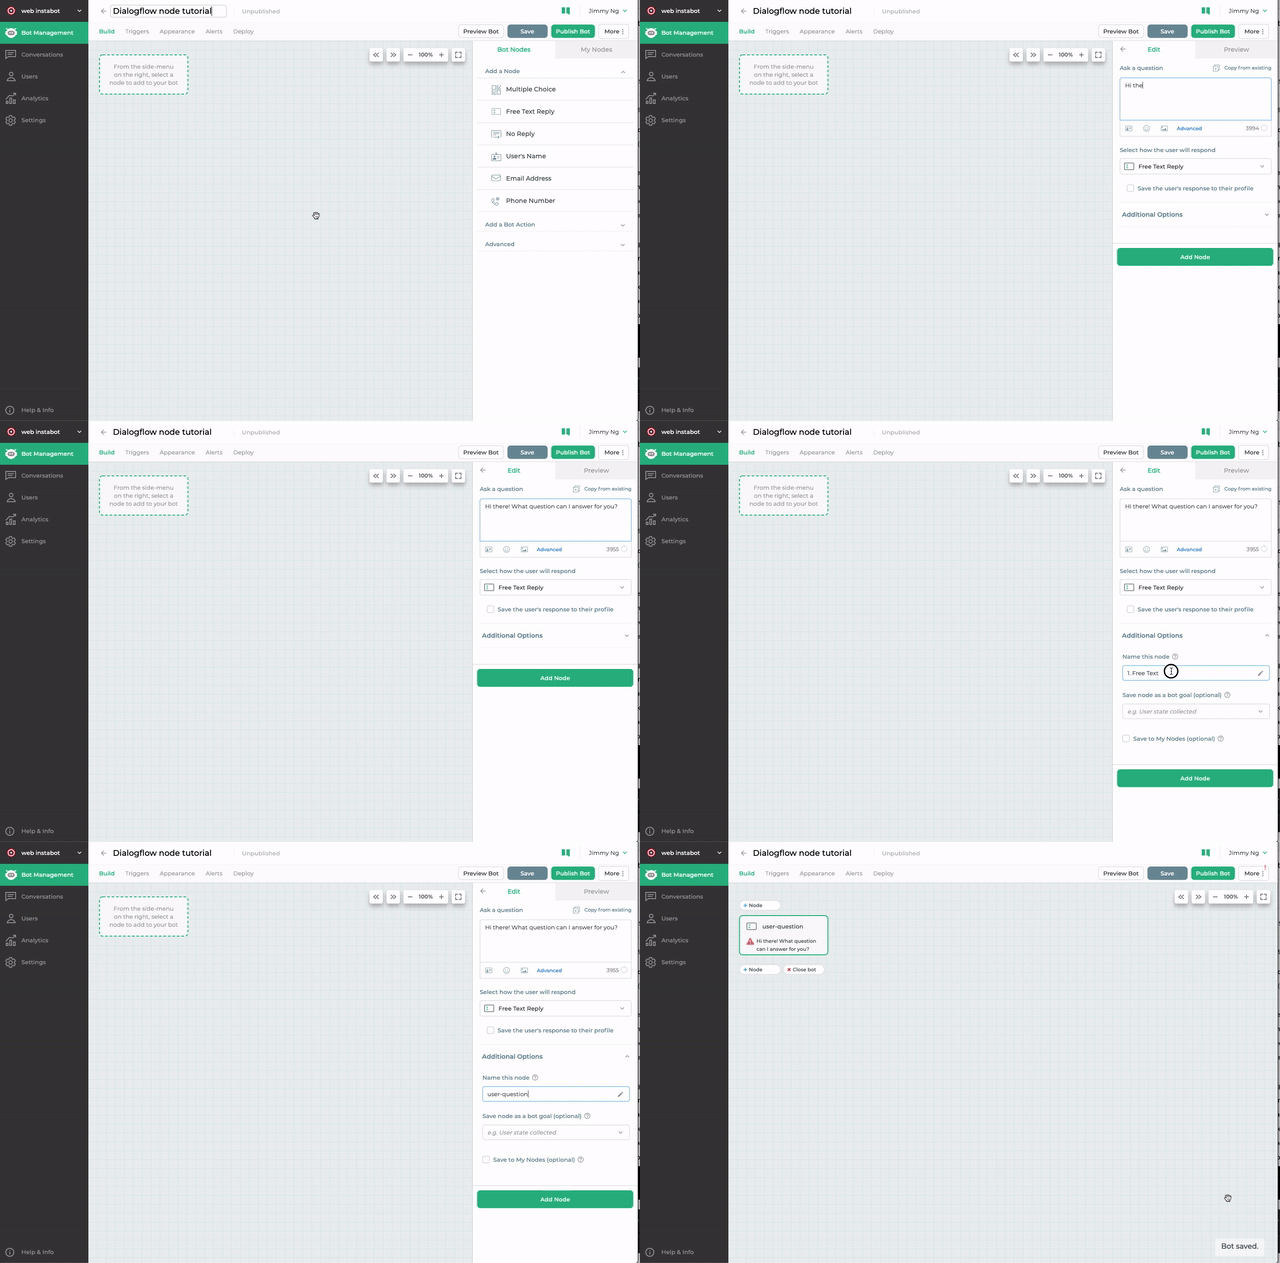
Free-text node to ask for the visitor's question
- Add a Dialogflow node after the free-text node from step #1 - for the first setting (Get the user's question from), select the free-text node that you added from step #1
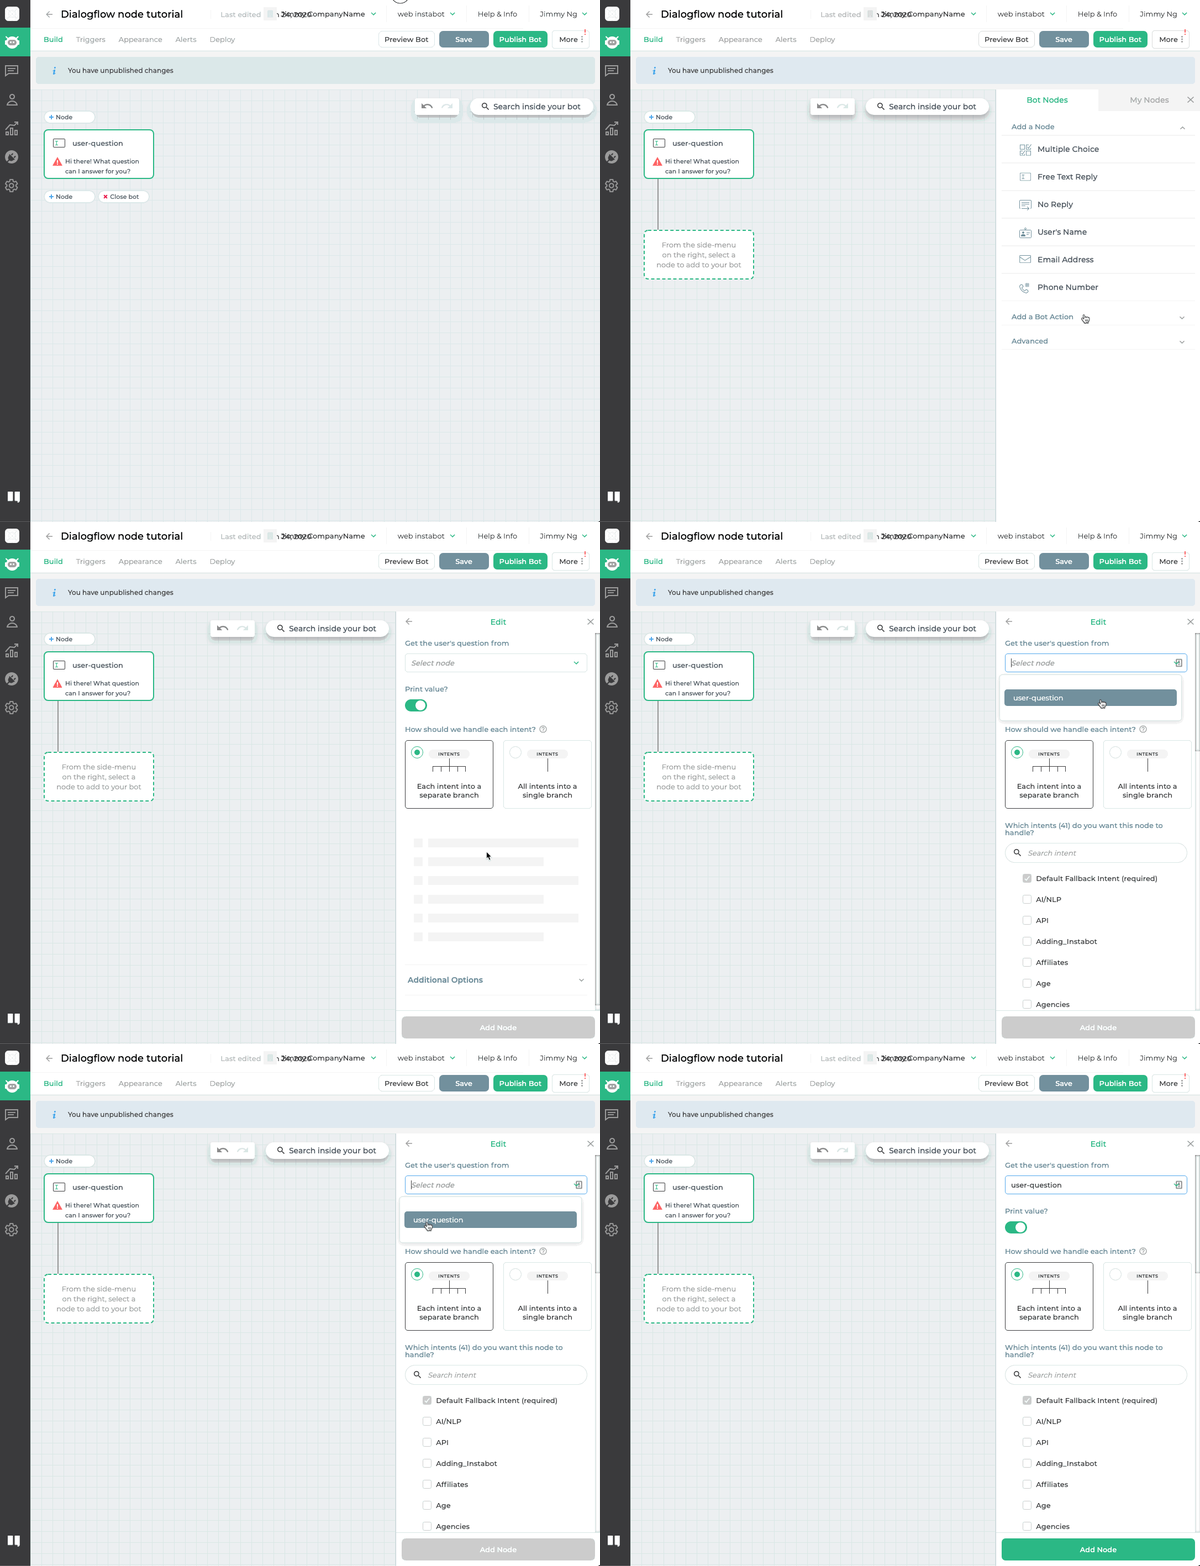
Add the Dialogflow node, and specify where the visitor's question will come from
- "Display text response from Dialogflow?" setting - this setting controls whether the bot will display the Dialogflow response back to the visitor. For this first time through, we can leave this setting enabled.
See this section on display/not-displaying text responses from Dialogflow for more detailed info.
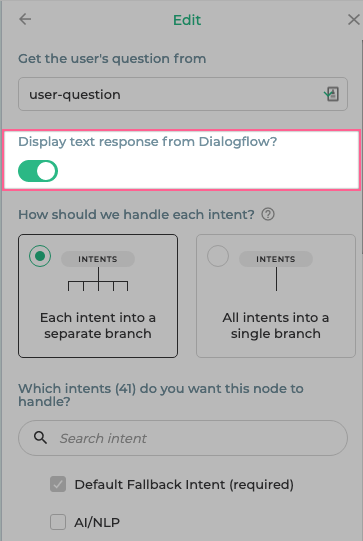
"Display text response from Dialogflow?" setting
- "How to handle each intent?" setting - this setting controls how each intent in your Dialogflow account will be expressed and handled in the bot-builder.
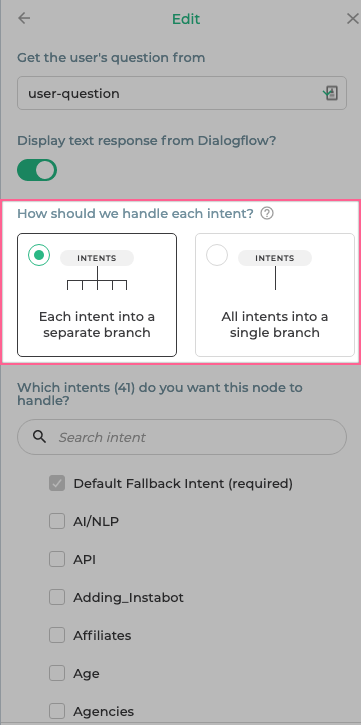
"How to handle each intent?" setting
For example, the screenshot below shows how each option will work in the bot-builder. See this section on Dialogflow intent branch modes for more detailed info.
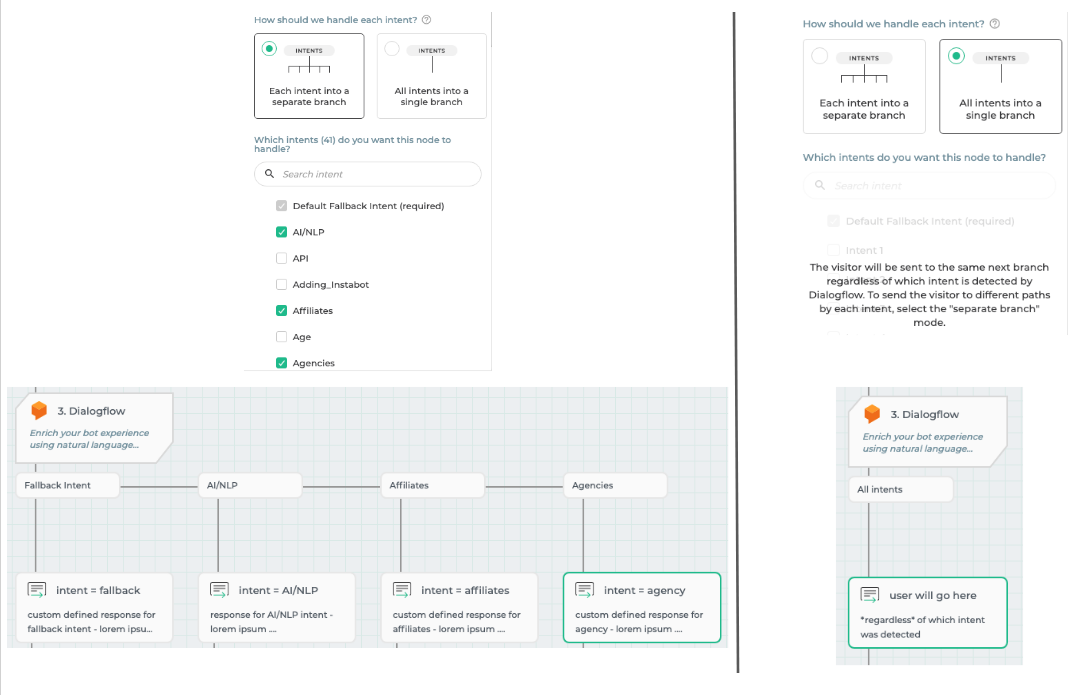
Dialogflow intent branch modes - "separate branches" vs "single branch"
You're done! Your bot is now ready to process and handle natural-language questions!
4. Advanced
Here are some more advanced things you can do with the Dialogflow node.
- 4a. Do not display the text responses from Dialogflow itself
- 4b. Route the user to different paths in the bot if Dialogflow returns the Default Fallback Intent
- 4c. Access the full JSON payload returned by the Dialogflow node
- 4d. "Separate branches" vs "Single branch" mode
4a. Do not display the text responses from Dialogflow itself
The most common way of implementing Dialogflow is to configure and manage text responses for each intent directly inside the Dialogflow console, and the bot will automatically display the text response for each intent. However, some customers find it easier to manage text responses for each intent from within Instabot instead of within the Dialogflow console.
To use Dialogflow in this way, you will do two things:
-
- Disable the setting for "Display text response from Dialogflow?"
-
- Add a conditional logic node for each intent you wish to display your own text response for
- Disable the setting for "Display text response from Dialogflow?"
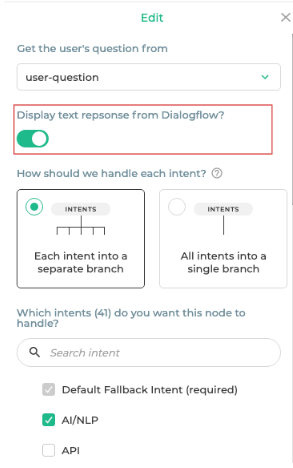
Disable this setting if you do not wish to automatically display text responses from Dialogflow
- Add a conditional logic node for each intent you want to display your own text response for - the example below shows me adding a conditional logic node that checks if the detected intent is "Pricing", and displays another node about pricing if so.
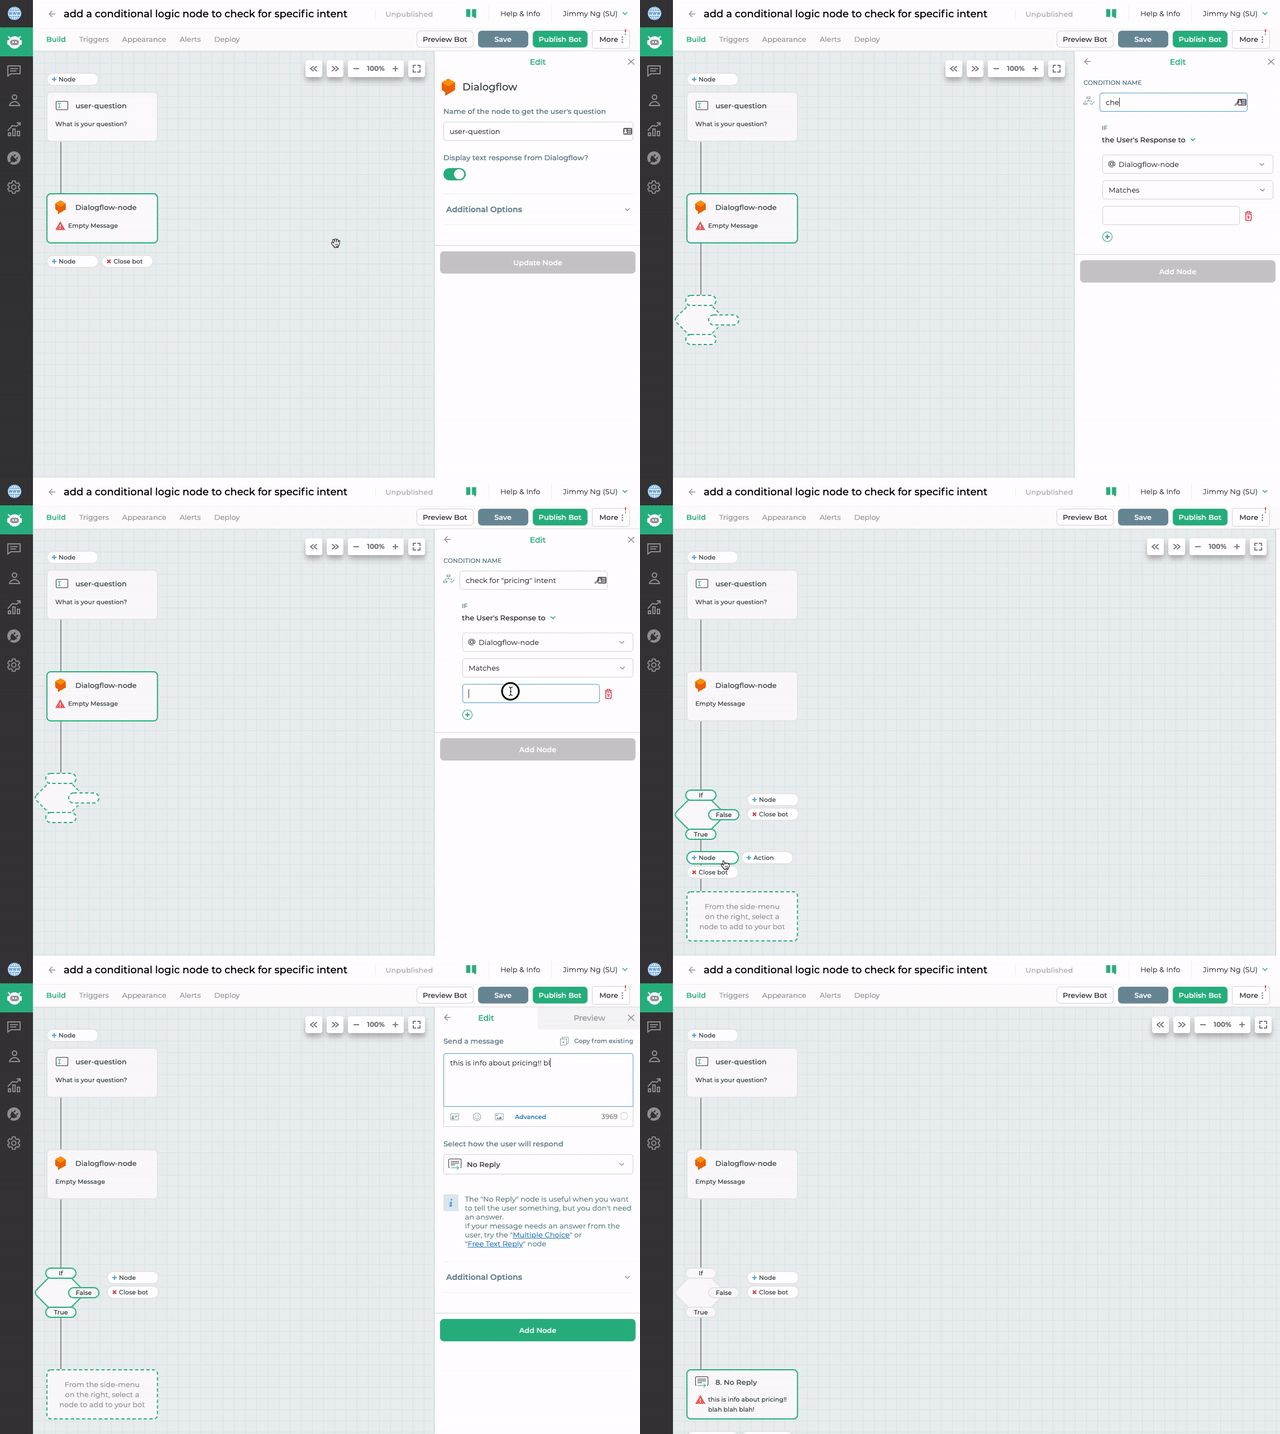
Also, if you have multiple intents that you want to check for, simply repeat this step by adding another conditional logic node to the first "False" path that checks for the second intent, and the third intent, and so on.
4b. Route the user to different paths in the bot if Dialogflow returns the Default Fallback Intent
Sometimes all you care about is detecting if Dialogflow couldn't understand the user's question (Default Fallback Intent), and then sending that user down a specific path to escalate their query to a human or get more information from them.
To use Dialogflow in this way, you will do two things:
-
- Enable the setting for "Display text response from Dialogflow?"
-
- Add a conditional logic node to check specifically for the Default Fallback Intent
- Enable the setting for "Display text response from Dialogflow?"
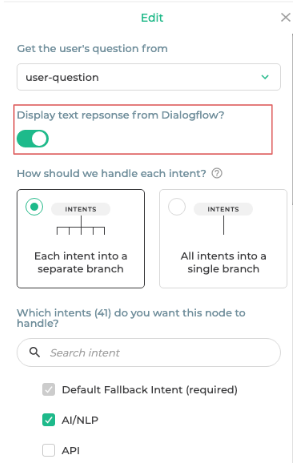
Enable this setting to automatically display text responses from Dialogflow
- Add a conditional logic node that checks for the Default Fallback Intent from Dialogflow, and sends the user down different paths depending on if yes or not.
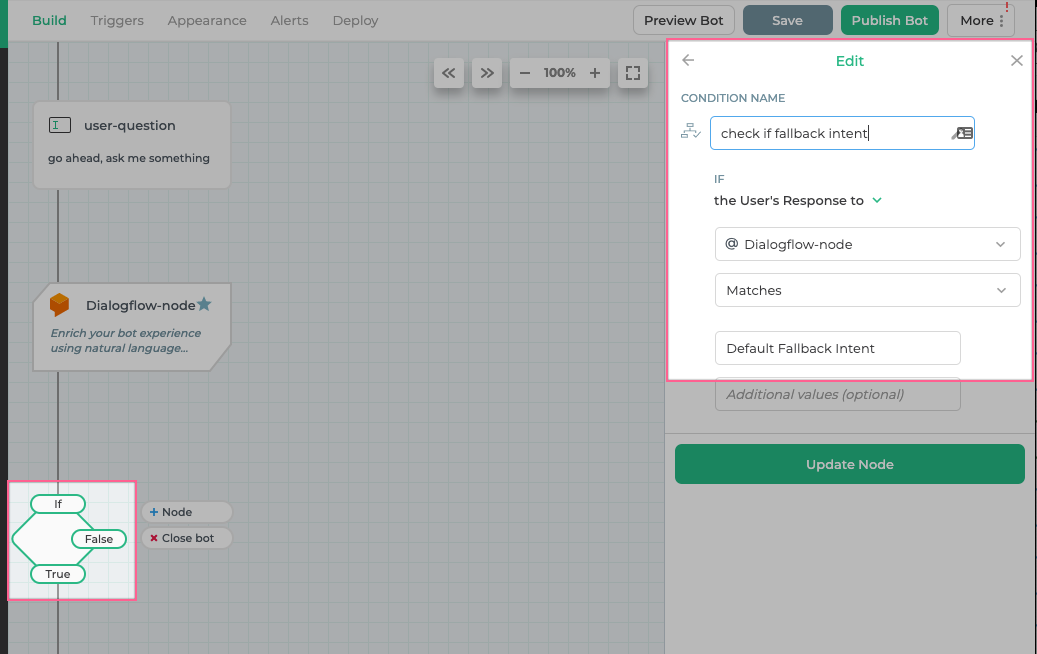
Add a conditional logic node
- Finally, add a node to each conditional node path that will send a user to when:
- Dialogflow detects Default Fallback Intent
- Dialogflow detects an intent that is not the Default Fallback Intent
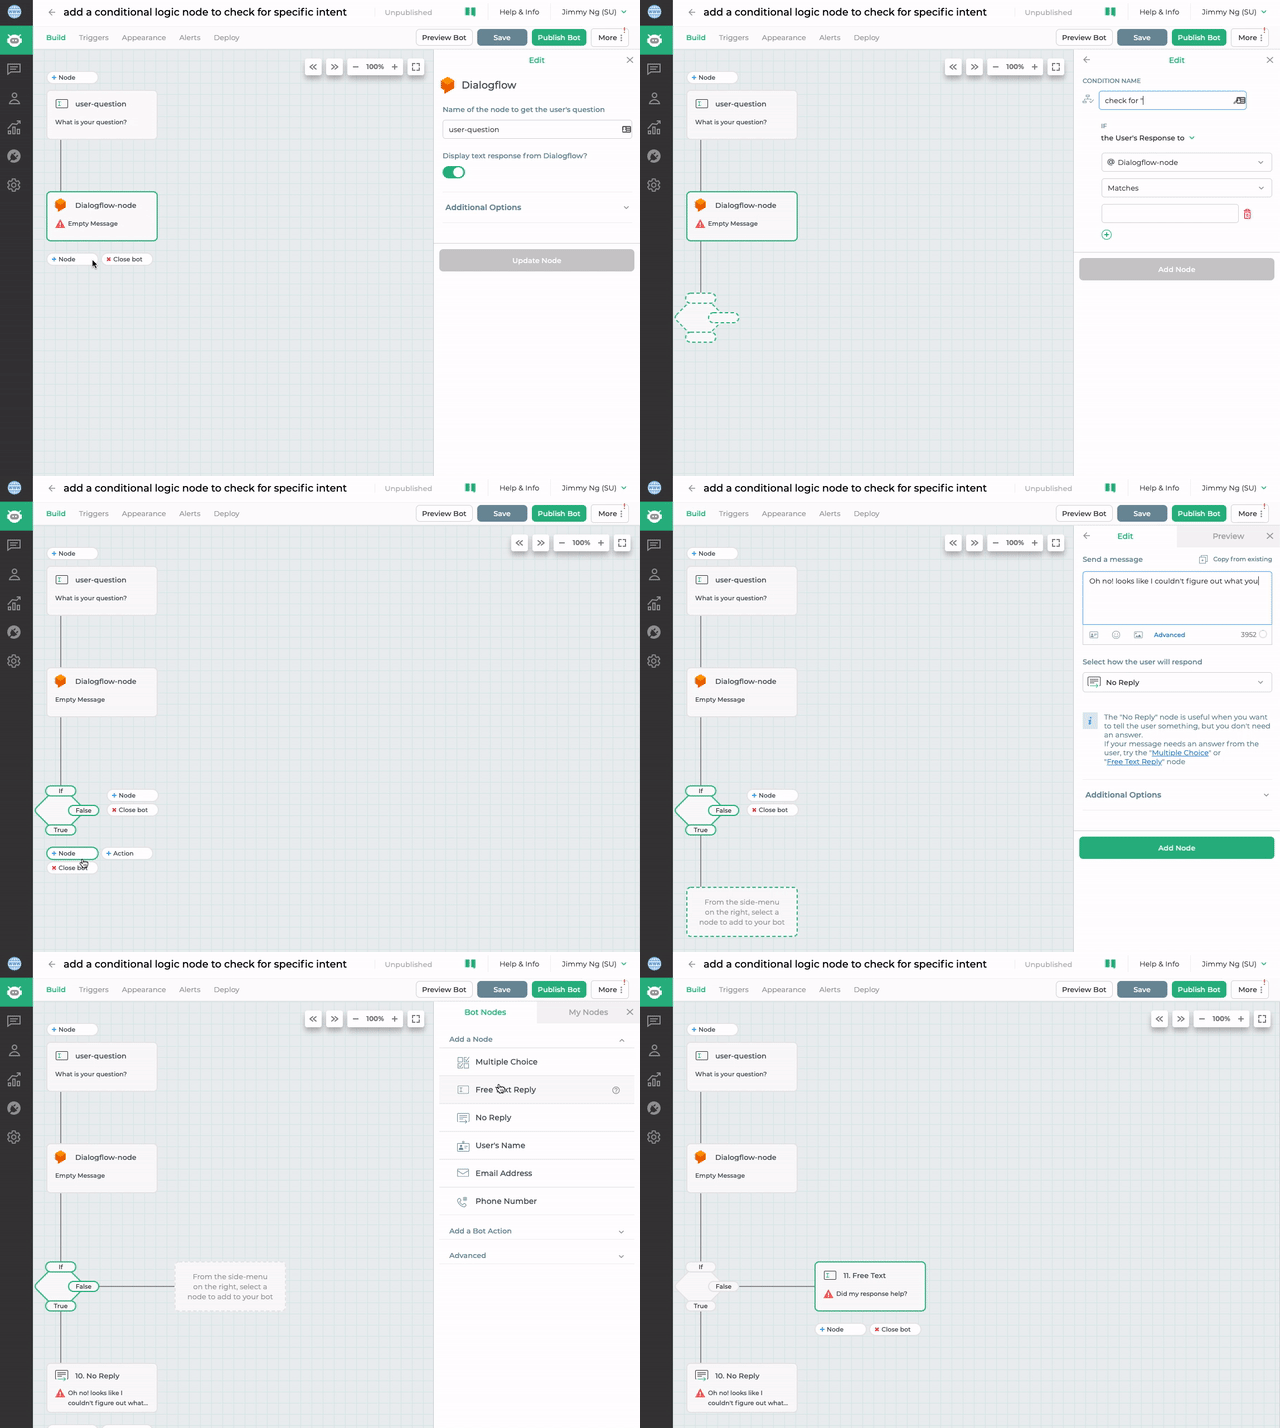
4c. Access the full JSON payload returned by the DF node
Now you know how to do dynamic routing based on the detected intent returned in the JSON payload of the DF node, but what if you need to access more stuff in the JSON payload.
Using the script node, you can access any field that's returned in the JSON payload of the detectIntent#QueryResult call.
// make sure the case of dfnodename matches EXACTLY your Dialogflow's node name
var dfnodename = "dialogflow";
var dfjsonpayload = context.getResponses()[dfnodename].objValue;

// insert logic to parse out whatever you're looking for in the JSON response payload
// eg: get queryResult.intent.displayName
console.log("intent displayName = " + dfjsonpayload.queryResult.intent.displayName);

next();
For more information on what else you can do after you've parsed the JSON response payload, see our script node documentation
4d. "Separate branches" vs "Single branch"
"How to handle each intent?" setting - this setting controls how each intent in your Dialogflow account will be expressed and handled here in the bot-builder.
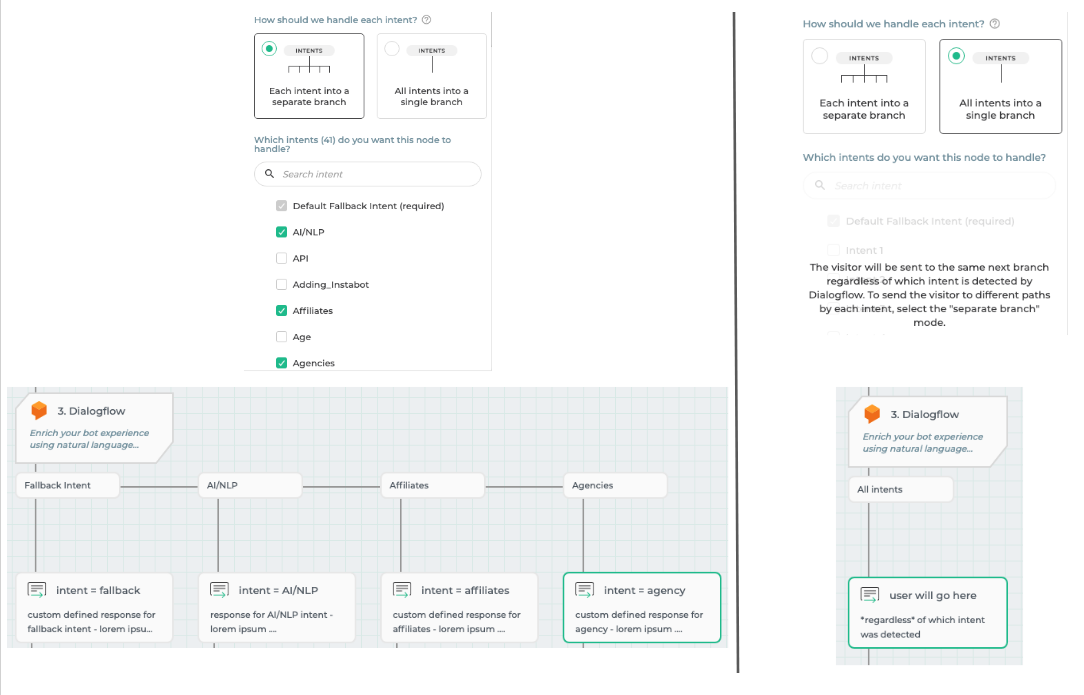
"Separate branches" mode:
The "separate branches" setting will automatically create multiple, distinct branches/options after your Dialogflow node for each intent that's selected in the node.
"separate branches" mode
This is useful if you want the option to send the user to different nodes/paths depending on which intent was detected.
- For example, the screenshot below shows four separate paths (Default fallback, NLP/AI, Affiliates, Agencies) that you can configure separately and independently of each other.
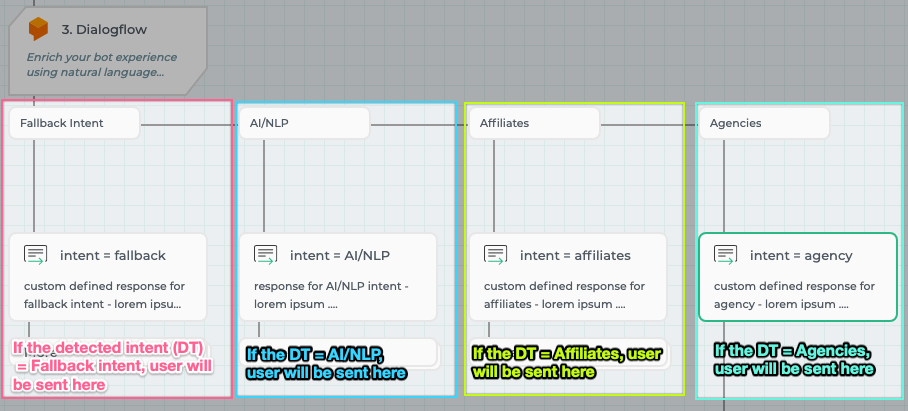
"separate branches" setting
"Single branch" mode:
The "single branch" setting will automatically create a single branch/option after your Dialogflow node for all/every intent.
"single branch" mode
The "single branch" mode is useful when you don't care about what intent was detected and you want to send the user down the same path no matter what.
- For example, the screenshot below shows a single branch/option after your Dialogflow node that every user will go down regardless of the detected intent. (of course you can still use conditional logic routing trick if you want).
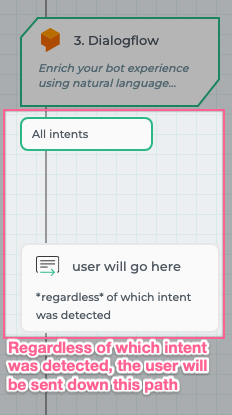
"single branch" setting
If you need help with anything here, please email us at [email protected]!
Updated about 3 years ago
