Zapier node
Don't have an Instabot account yet?
1. Getting started
Zapier node is additional extension to provide flexible way to communicate between bot and Zapier. It allows to pass any data from bot (entered by user or extracted from other APIs) to Zapier at any point of the conversation and receive response back so it can be modified and shown in the conversation with user.
Create a Zapier Account
If you haven't already done so, make sure to create a Zapier account here.
Once you have an account follow the steps below to start using your Instabot conversation data in your other applications integrated with Zapier.
2. Set up Zapier node
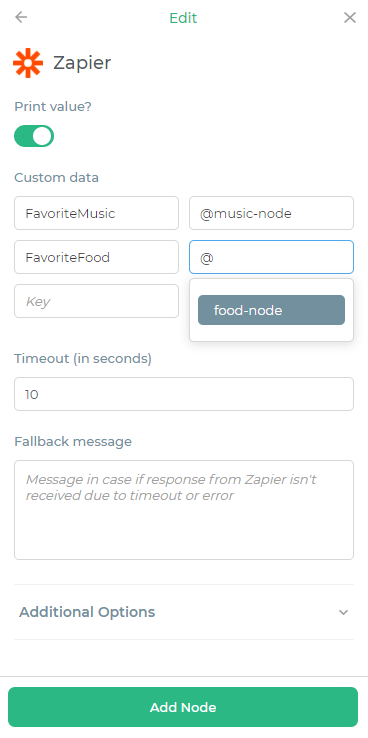
In the bot-builder, add a node --> Advanced --> Zapier node

* Print value?
If enabled then message received from Zapier will be shown in the conversation. Message received from Zapier can also be:
- inserted somewhere in the text of another node using macros: @MyZapierNodeName
- accessed via script node by calling context.getResponseByNodeName("MyZapierNodeName").
* Custom data (optional)
This is a key value collection (dictionary) that will be passed into Zapier. Plain text and text substitutions for user properties (e.g. {FULLNAME}) and nodes responses (e.g. @MyFreeTextNodeName) can be used as values.
* Timeout (in seconds) (required)
Timeout - maximum time allowed to receive response from Zapier. If no response during this time then Zapier node will be skipped and next node in the tree will become active.
* Fallback message (optional)
Fallback message will be shown if no response received from Zapier during timeout.
3. Set up Zapier account
Step 1
Choose the "Make a Zap" button when you are logged into Zapier.
This will lead you to the Zap wizard that walks you through each step of creating a Zap.
Step 2
Search for the Instabot App by typing in "Instabot" in the search bar. Click on the App.
Step 3
Choose "Zapier Node" trigger.
Step 4
Connect to your Instabot application by entering the API Key and API Master Key found within your Instabot account's application settings.
Step 5
Choose "Bots" and/or "Bot Nodes" that will trigger this Zap.
Note:
If you don't care which particular Zapier node in the bot should trigger this Zap then select some bots in the "Bots" field. If you need more granular control then it's better to select specific Zapier nodes in the "Bot Nodes" field.
Step 6
Click on "Test trigger" button. This will fetch some user properties and Zapier nodes' custom data which is called "extension" here.
Step 7
Now it's time to add some actions of your choice to manipulate the data received from Instabot conversation. When you're done with that, in order to send a message back to the conversation you need to add "Send a Message" action from same app you've connected on step 4.
Step 8
Next you'll be able to set up the message which will be sent to the Instabot conversation. Note that either "User Id" or "Email" needs to be specified, otherwise Zapier won't know to whom send the message.
Step 9
Click on "Test & Continue" button.
You should receive "Message is not delivered due to user inactivity" message and this is fine since there's no active user for test action.
Next click on "Turn on Zap" button and that's it, you're all set.
Updated over 5 years ago
